
WorldCard Cloud_iOS User Manual
Login
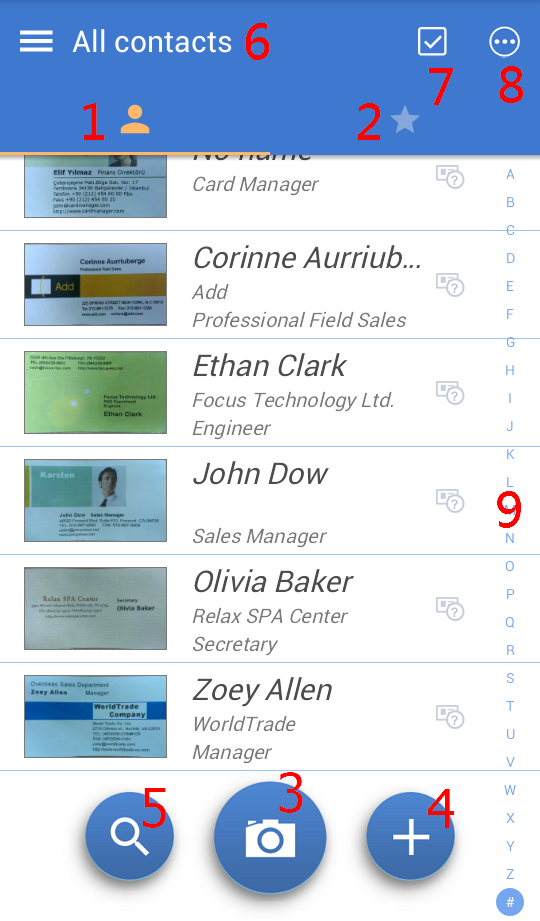
User Interface Introduction
Add New Contact
Edit Contact
Contact Category Management
View and Use the Contact
Information
Sharing Contacts
Shared Contacts
Synchronize with WorldCard
Cloud server
Scan for Colleague
Notification
Advanced Functions
Settings
Please open the WorldCard Cloud app, and enter you your account and password to log in.
If you forgot the password, please click on [Forgot Password] button to reset password.
Notice: One account can only log in to a computer and a smart phone at the same time. For example, after logging in to the iPhone and logging in to the Android phone again, the connection on the iPhone side will be suspended, but the web version is not limited here.
Tips: If the administrator asks to bind the login device, or if you want your account to be logged in only on your mobile phone to avoid others using your account, please log in on the phone you want to bind first, then tap [Device ID] at the bottom of the login screen to provide the mobile device information to the administrator to confirm and bind.
WorldCard Cloud provides many ways to add contact:
Using Camera to Shoot Business
Card
Shooting Business Card via Dock
Mode
Scanning the Contact’s QR Code
Import Contact File
Manually Establish Contacts
Add Contacts from Eemail Signature
Add Contacts from Card Image
Download from Shared Contacts
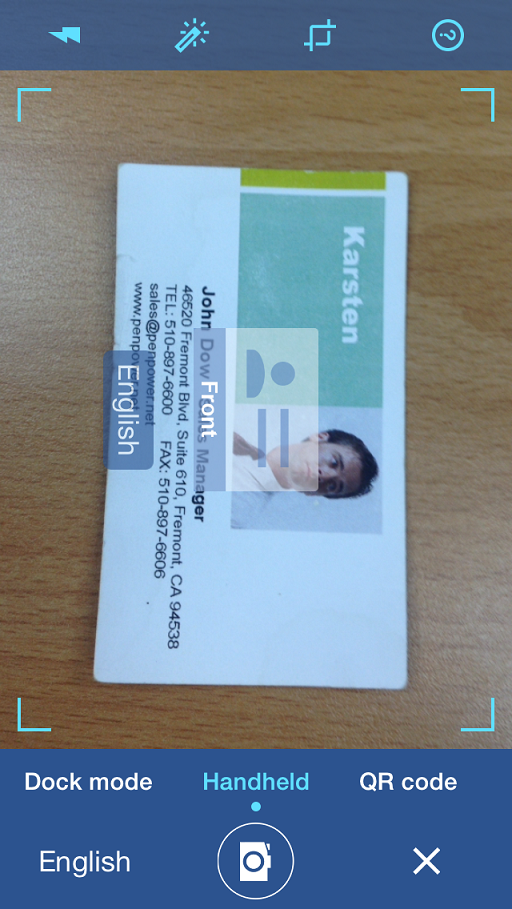
Using Camera to Shoot Business Card
Tap ![]() icon on the main page to launch camera, please
check if the mode is selected on [Handheld]
mode.
icon on the main page to launch camera, please
check if the mode is selected on [Handheld]
mode.
Next to the camera icon is the [Recognize
Language] option, tap it to select the language
you want to use first. Then rotate your mobile
phone to portrait or landscape according to the
business card and make sure the business card
image is fully loaded in the screen. Please
shoot above the business card and try to avoid
shadows as possible, and tap
![]() to focus automatically and shoot.
to focus automatically and shoot.
There are Flashlight
![]() ,
Lighten
,
Lighten ![]() ,
Auto Crop
,
Auto Crop
![]() and Macro
and Macro ![]() functions
on the screen for you to choose. You may turn on
/
off the flashlight when shooting, or lighten the
picture automatically to make the texts become
more recognizable, or auto crop the part outside
of the business card.
functions
on the screen for you to choose. You may turn on
/
off the flashlight when shooting, or lighten the
picture automatically to make the texts become
more recognizable, or auto crop the part outside
of the business card.
After shooting, you will see the result with
lighten and cropped in the next step, you can
also tap
![]()
![]() to rotate the picture. If you are not satisfied
with result, please tap
to rotate the picture. If you are not satisfied
with result, please tap
![]() to shoot again.
to shoot again.
If the back side of the card also has
information, you can tap ![]() to add the picture of back side, then turn the
card to the back side to shoot and remember to
choose the correct language for recognize before
shooting.
to add the picture of back side, then turn the
card to the back side to shoot and remember to
choose the correct language for recognize before
shooting.
If you have lots of cards to manage, after
shooting the first card (include back side), you
can tap ![]() to do batch shooting. It will shoot all the
cards in one time and then do the recognition at
the end.
to do batch shooting. It will shoot all the
cards in one time and then do the recognition at
the end.
After shooting, tap ![]() to
start recognition, and then you will see the
recognized contacts appeared in the list.
to
start recognition, and then you will see the
recognized contacts appeared in the list.
If you have WorldCard Mobile Phone Kit, please
tap ![]() to launch camera, and slide the mode to [Dock],
and then just put your phone on the dock to
shoot.
to launch camera, and slide the mode to [Dock],
and then just put your phone on the dock to
shoot.
Tap the ![]() icon to launch the camera and slide to choose
the mode to [QR code]. Then let the camera point
to the QR code you want to scan, it will focus
and recognize it automatically. If the shooting
environment is too dark, you can tap
icon to launch the camera and slide to choose
the mode to [QR code]. Then let the camera point
to the QR code you want to scan, it will focus
and recognize it automatically. If the shooting
environment is too dark, you can tap ![]() and
and ![]() to
enable the flashlight lights to assist.
to
enable the flashlight lights to assist.
Tap the ![]() icon on the main screen, and choose [Import] to
import the contacts from the phone, or import
the contact files from the local storage or
cloud storage. Tap
icon on the main screen, and choose [Import] to
import the contacts from the phone, or import
the contact files from the local storage or
cloud storage. Tap ![]() to
start importing after you select the files.
to
start importing after you select the files.
The file formats which WorldCard supports are WorldCard Data Exchange File (*.wcxf) and vCard file(*.vcf). When you choose to import from local storage, WorldCard will search and list all the usable files. Moreover, when you import from cloud storage the first time, it will ask you to enter the account/password of the cloud storage to access.
Tap the ![]() icon on the main screen and choose [Create
Manually] to enter the contact's information.
Then tap
icon on the main screen and choose [Create
Manually] to enter the contact's information.
Then tap ![]() icon on the top right corner to save.
icon on the top right corner to save.
Add Contacts from Email Signature
Please select and copy the contact's Email signature in the Email first.
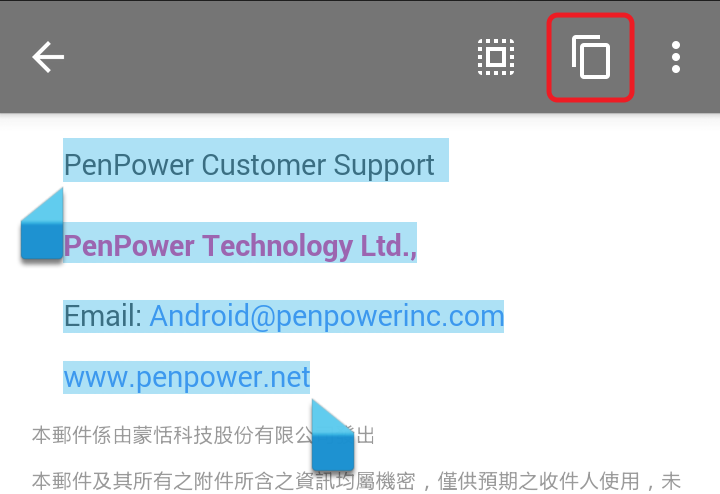
Open WorldCard Cloud app and tap ![]() icon
from the main screen to choose [Email
Signature]. The Email signature will be pasted
into the WorldCard Cloud automatically. Then tap
icon
from the main screen to choose [Email
Signature]. The Email signature will be pasted
into the WorldCard Cloud automatically. Then tap
![]() to start recognizing.
to start recognizing.
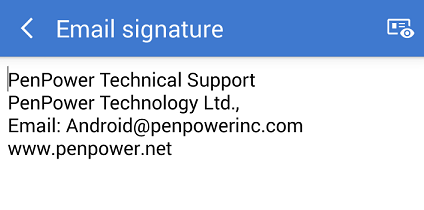
Note: In case if the pasted signature is chaotic, please adjust the wording before recognizing.
Tap ![]() icon from the main screen to choose [Photo
Album] and select the card images you want to
add. Then choose the recognize language from the
top of the screen and tap
icon from the main screen to choose [Photo
Album] and select the card images you want to
add. Then choose the recognize language from the
top of the screen and tap ![]() to import and recognize. Once done, tap
to import and recognize. Once done, tap
![]() icon
from the top right corner to save.
icon
from the top right corner to save.
Please refer to the Chapter of [Shared Contacts].
Note: After adding new contacts, you can still add / change the contact's card image and select additional information from the card image to recognize. And you can also add notes to the contact. Please refer to the next Chapter [Editing Contact] for more details.
Edit Text Information
If you add contact via shooting, or if there is
update on the contact, you will need to edit
your contact information. If so, please tap the
contact you need to edit to enter the detail
information page, and tap ![]() icon from the top right corner, and then choose
[Edit] to enter editing page.
icon from the top right corner, and then choose
[Edit] to enter editing page.
If you use the function of batch shooting
/
loading multiple card images to add contacts,
you will see a mark
![]() on the contacts, which means these contact
information, have not been verified. You can
just tap them to enter the editing page to
verify them.
on the contacts, which means these contact
information, have not been verified. You can
just tap them to enter the editing page to
verify them.
When you tap the field you want to edit, the original image area which belongs to that field will appear on the top of the screen for you to verify. Please note this function is only available on the contacts added by shooting via this mobile device. It is not available if the contact is imported from somewhere else.
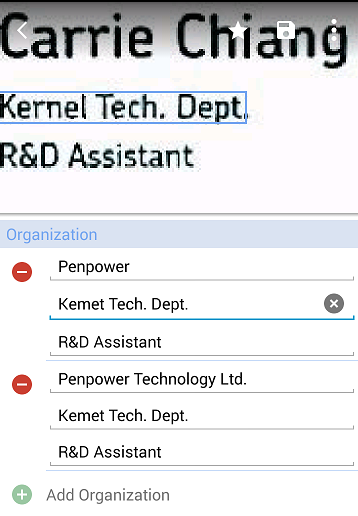
In the editing page, tap ![]() /
/
![]() to add/delete any field. You can also change the
field label, E.g. you can change the phone
number from [Home] to [Office]. Moreover, you
can tap
to add/delete any field. You can also change the
field label, E.g. you can change the phone
number from [Home] to [Office]. Moreover, you
can tap ![]() on top of the screen to open the menu, and then
tap
on top of the screen to open the menu, and then
tap
![]() to change the card image.
to change the card image.
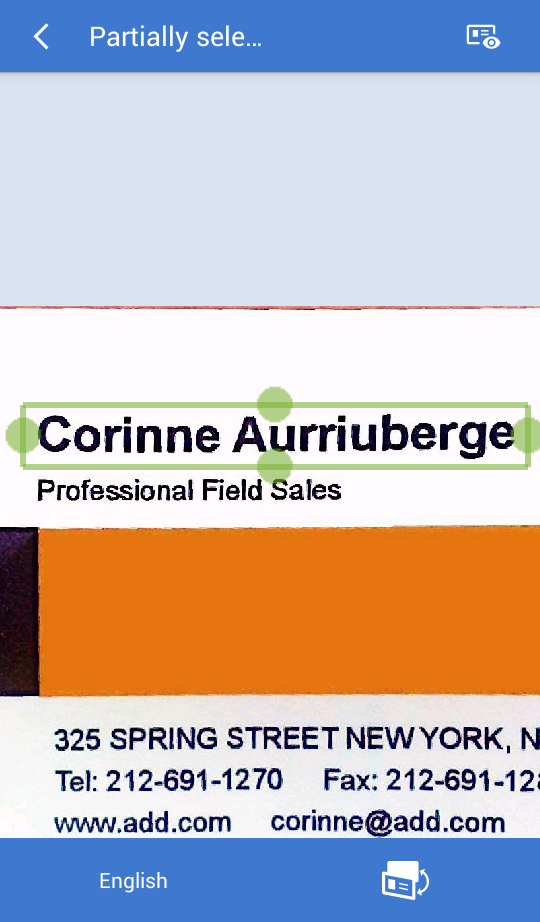
If field information was not recognized, you can
tap ![]() on the top right of the screen to open the menu,
and then tap
on the top right of the screen to open the menu,
and then tap ![]() to open partial-select function. At this time
you can use two fingers to enlarge the picture,
and move or scale the green frame on the image
to select the information you want to recognize.
Then choose the recognition language at the
bottom. After you tap
to open partial-select function. At this time
you can use two fingers to enlarge the picture,
and move or scale the green frame on the image
to select the information you want to recognize.
Then choose the recognition language at the
bottom. After you tap ![]() on the up-right corner, many fields will be
listed for you to select. Now you can choose the
right field which the partially selected
information belongs to. Then WorldCard will
recognize and input the information into the
field you just selected.
on the up-right corner, many fields will be
listed for you to select. Now you can choose the
right field which the partially selected
information belongs to. Then WorldCard will
recognize and input the information into the
field you just selected.
If you need information from the back side of
the card, just tap ![]() icon to change to the back side card image.
icon to change to the back side card image.
After editing, please remember to top ![]() to save.
to save.
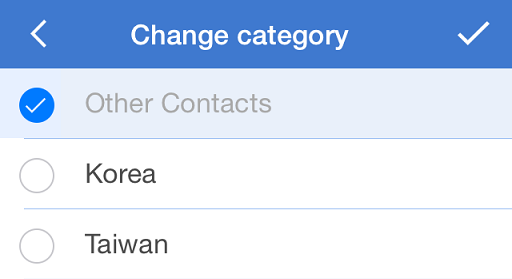
Categorize Your Contacts
There is a [Category] item
![]() at
the bottom of contact information page, you can
tap it to modify this contact's category.
Please refer to the next section [Contact
Category Management] for the establishment and
management of the categories.
at
the bottom of contact information page, you can
tap it to modify this contact's category.
Please refer to the next section [Contact
Category Management] for the establishment and
management of the categories.
Edit Card Image
Tap a contact to enter information page, and tap
the card image from top of the screen to enter
card image viewing mode. Now you can rotate the
image with ![]()
![]() icon, refresh
with
icon, refresh
with ![]() icon
or add back side card image with
icon
or add back side card image with ![]() icon.
To tap
icon.
To tap ![]() icon at the bottom of the screen will allow you
to delete or process the images.
icon at the bottom of the screen will allow you
to delete or process the images.
In the image process page, you can tap ![]() to lighten the image to make the text more
recognizable. You can move and scale the green
frame in the image to select the card, and then
tap
to lighten the image to make the text more
recognizable. You can move and scale the green
frame in the image to select the card, and then
tap ![]() to cut off the extra parts. When it is done, you
can tap
to cut off the extra parts. When it is done, you
can tap ![]() to save the changes. To tap on
to save the changes. To tap on ![]() will allow you to reframe the image.
will allow you to reframe the image.
If the contact does not have card image, tap
![]() to
add a card image for this contact.
to
add a card image for this contact.
Add New Category
Click
![]() on the menu to enter the category setting page,
select [All Contacts], then click
on the menu to enter the category setting page,
select [All Contacts], then click
![]() at the top right, then enter the name of the
category you want to add, and press [OK] to
complete.
at the top right, then enter the name of the
category you want to add, and press [OK] to
complete.
If you want to create a subcategory, first
select the main category, then click
![]() at the top right, then enter the subcategory name you want to
add, and press [OK] to add a new subcategory under the main
category.
at the top right, then enter the subcategory name you want to
add, and press [OK] to add a new subcategory under the main
category.
Modify / Delete Contacts
In the category setting page, tap on a category, and then choose [Rename] can change the category name; if you choose [Move category], you can move the category to other categories, for example, you can move a subcategory to the [All Contacts] as the main category, or move the main category to another main category as a subcategory.
If you tap the [Delete] below, the category will be deleted.
Note: As long as there is any contact information in the category, the category cannot be deleted.
Pin the Commonly Used Category
There will be a
![]() button on
the left of the category menu, you
can tap
it to
pin the category
as a commonly used
category, in this way,
you don't have to search for the
commonly
used categories in
the whole
categories, just
simply tap
button on
the left of the category menu, you
can tap
it to
pin the category
as a commonly used
category, in this way,
you don't have to search for the
commonly
used categories in
the whole
categories, just
simply tap
![]() below the category menu screen to switch to the
pinned list, then you
will be
able to
find
the contact
information much easier.
To
remove from the
pinned list,
just click
below the category menu screen to switch to the
pinned list, then you
will be
able to
find
the contact
information much easier.
To
remove from the
pinned list,
just click
![]() .
.
Reminder: Category changes are instantly synchronized with the WorldCard Cloud server, so you will not be allowed to make category changes when used in offline mode.
View and Use the Contact Information
After establishing your own contacts, you can review and use these contact information anytime.
If you have lots of contacts, you can use full text search
function ![]() to find data. You can also enter a keyword of any field and it
will list all the possible results.
to find data. You can also enter a keyword of any field and it
will list all the possible results.
When you review the contact information, you can tap the following icons to trigger the related functions:
Phone
![]() :
Tap to call this contact or tap
:
Tap to call this contact or tap ![]() to send text.
to send text.
Email ![]() :
Tap to send Email to the contact.
:
Tap to send Email to the contact.
Address ![]() :
Tap to open the contact's web page.
:
Tap to open the contact's web page.
Web Page
![]() :
Tap to open the contact's web page.
:
Tap to open the contact's web page.
If the contact's card has information on both sides, tap ![]() to
switch the card image to the other side.
to
switch the card image to the other side.
When you put your phone horizontally, the screen will
automatically switch to [Cover Flow Mode] for you to easily look
up the contacts by flipping images, you can slide the card
images or the index bar on top to find contacts. You can tap on
![]() to make call,
to make call, ![]() to send Email and
to send Email and
![]() to
open the map of Contact's Address. All these function buttons
are at the bottom-right corner for you to choose and use easily.
to
open the map of Contact's Address. All these function buttons
are at the bottom-right corner for you to choose and use easily.

Tap ![]() icon on the top-right corner of the screen to add note for this
contact, and then tap
icon on the top-right corner of the screen to add note for this
contact, and then tap ![]() to insert the current date for your record. In addition, you can
even tap
to insert the current date for your record. In addition, you can
even tap ![]() icon to open the menu for you to search the contact on popular
social websites, or to share the contact information with other
people. Also you can edit/delete the contact information or
recognize it over again.
icon to open the menu for you to search the contact on popular
social websites, or to share the contact information with other
people. Also you can edit/delete the contact information or
recognize it over again.
If a contact is your close friend or the person you frequently
contact, you can tap ![]() to add this contact into your My Favorite list. In the Favorite
list, you can tap
to add this contact into your My Favorite list. In the Favorite
list, you can tap ![]() to call immediately, or tap
to call immediately, or tap ![]() to
sort the favorite contacts into the order where the most popular
contacts to the top, or tap
to
sort the favorite contacts into the order where the most popular
contacts to the top, or tap
![]() to search contacts.
to search contacts.
Tips: Tap ![]() again to remove the contact from the favorite list.
again to remove the contact from the favorite list.
Also when in the main page, you can tap
![]() icon from the top right to select the contacts, and then tap
icon from the top right to select the contacts, and then tap
![]() /
/ ![]() to
send Email or text to the selected contacts. You can also tap
to
send Email or text to the selected contacts. You can also tap
![]() to
modify the contact's category or tap
to
modify the contact's category or tap
![]() to share the contacts information with other people.
to share the contacts information with other people.
Tap ![]() icon
from bottom to open the menu of deleting or exporting the
contacts. You can either choose the location to export into or
the format to export into, such as CSV or VCF.
icon
from bottom to open the menu of deleting or exporting the
contacts. You can either choose the location to export into or
the format to export into, such as CSV or VCF.
In addition, if the administrator has enabled the function of accessing company CRM or the company address book, please log in to the account in the settings first, and then you can export.
If you need to share the contact with your
colleagues or to delete the contact, you can tap ![]() at the bottom to choose either [Share with Colleagues] or
[Delete]. Please refer to the next Chapter for details on how to
share contacts.
Please refer to (Sector
5.) of Chapter [Shared Contacts] for detail precautions while deleting.
at the bottom to choose either [Share with Colleagues] or
[Delete]. Please refer to the next Chapter for details on how to
share contacts.
Please refer to (Sector
5.) of Chapter [Shared Contacts] for detail precautions while deleting.
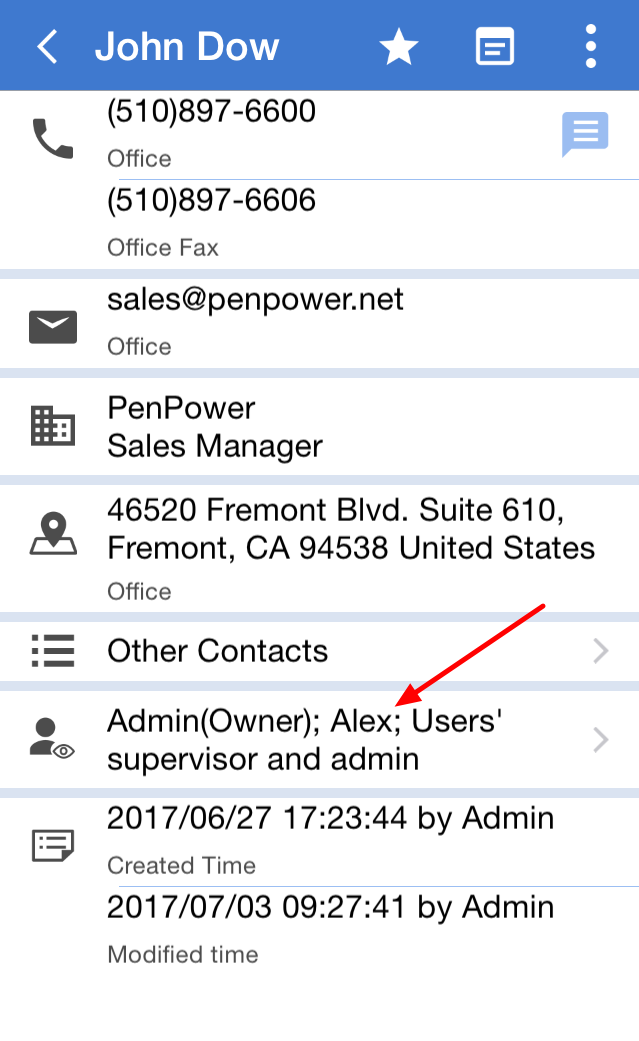
WorldCard Cloud users can only see their own contacts and the contacts from their subordinates. WorldCard Cloud users are not able to see the contacts from personnel with higher lever and other non-subordinate personnel.
If you want to share contacts with other users, you can select contact first.
Then tap on ![]() from the bottom and select [Share to colleagues] to open the menu. Now you can
select certain users who need to view the contacts. Or, when you view the
contact, tap on [Accessible Users] will allow the other users to share
immediately.
from the bottom and select [Share to colleagues] to open the menu. Now you can
select certain users who need to view the contacts. Or, when you view the
contact, tap on [Accessible Users] will allow the other users to share
immediately.
The other users who are allowed to share the contact will receive a notification. Therefore they will be able to see shared contacts in [Shared Contacts]. For more details on [Shared Contacts], please read next Chapter. For more information about Notification, please read the Chapter of [Notification].
Note: The dominators of the users who you have shared contacts with will also be able to see the contacts.
Notice: Each shared contact is individual. Once it is shared, it cannot be canceled. For example, after a contact is shared with user A, you are not able to cancel user A’s right to see the contact. However it will not affect the other contacts of yours. User A will not see the other contacts which you have not shared with.
When other users share the contacts with you, you will be able to view the contacts in [Shared Contacts].
Please tap ![]() from top right to open selection list. Then tap on [Shared
Contacts] to view the contacts.
from top right to open selection list. Then tap on [Shared
Contacts] to view the contacts.
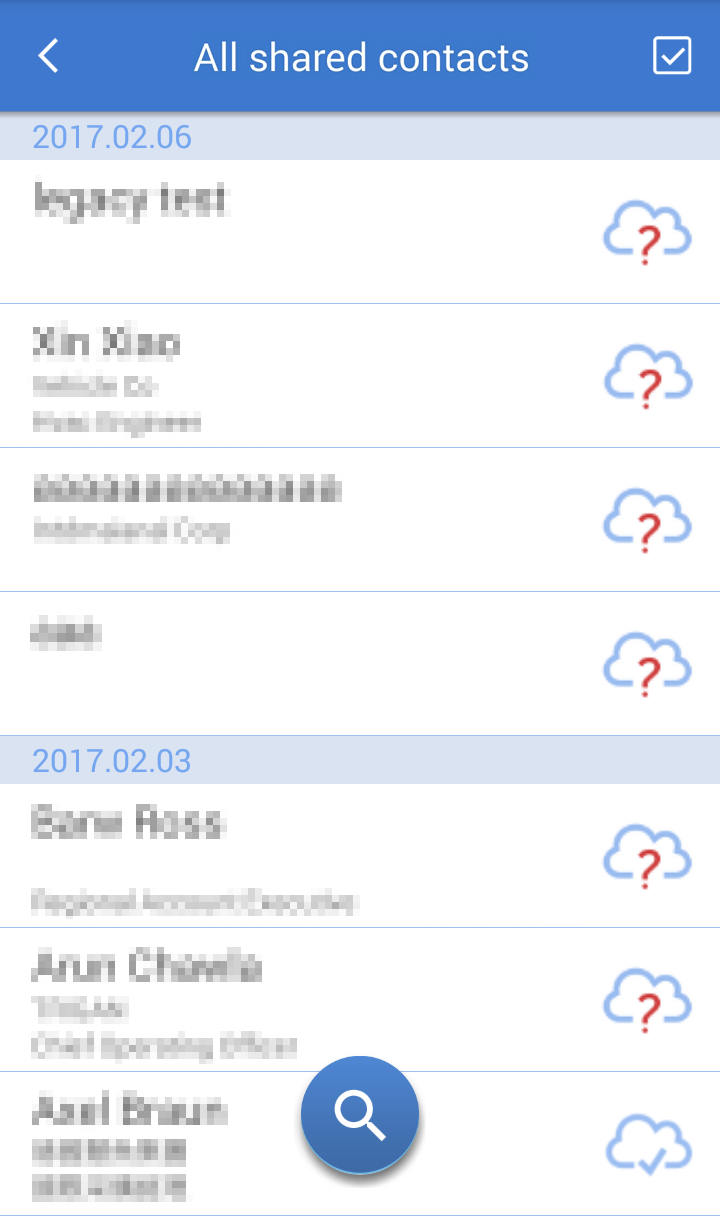
What you see in [Shared Contacts] is
what other users have shared with you or allowed to see; if you
are not sure who shared it with you, you can click on the top [All
shared contacts]
item to
enter all shared
data,
and click
![]() to search; if you know who the sharer is, please click on the
user's name in the list to browse the
data
shared by the user.
to search; if you know who the sharer is, please click on the
user's name in the list to browse the
data
shared by the user.
Because Shared Contacts are for public use, they are not able
to edit. However, tap ![]() will
let you to download and save the contact to your
[My Contacts].
Once it is saved to My Contacts, you will be able to edit it.
After editing, the changes will be reflected in Shared Contacts
and the contacts of other users whoever have downloaded the same
contacts.
will
let you to download and save the contact to your
[My Contacts].
Once it is saved to My Contacts, you will be able to edit it.
After editing, the changes will be reflected in Shared Contacts
and the contacts of other users whoever have downloaded the same
contacts.
There is an
![]() icon
on the contacts which have not been downloaded. And there is
icon
on the contacts which have not been downloaded. And there is
![]() icon on the contacts which have already been downloaded. You can
tap
icon on the contacts which have already been downloaded. You can
tap ![]() to
select multiple contacts, and then tap
to
select multiple contacts, and then tap ![]() to
download them again or tap
to
download them again or tap ![]() to share with other
users. The subordinators of the other users will be able to see
these contacts as well.
to share with other
users. The subordinators of the other users will be able to see
these contacts as well.
Reminder: If the who shared the contact with you is not the original owner of the contact, you will not see this person as the original owner in [Shared Contacts]. For example, if the owner of the contact is A and B is the person who shared the contact with you, the contact is certainly under name of A in Shared Contacts.
If you have ever established some contacts and synced with the WorldCard Cloud server, but deleted those contacts from [My Contacts] afterwards, you will see [Undownloaded] in the list of categories in your user name. The contacts mentioned above that were created by you but currently only exist on the WorldCard Cloud server will be listed in here, for you to download them again someday.
Synchronize with WorldCard Cloud Server
When you edit/share/download contacts and make changes, all these actions will not be executed and completed unless you synchronize with the server.
There are two ways of synchronization:
Automatically or Manually. Tap ![]() from top left to open the selection list and tap
from top left to open the selection list and tap ![]() from top to start synchronization.
from top to start synchronization.
Tips: If on the screen of Contacts, simply pull down the screen will start synchronization.
If you want the program to synchronize automatically,
please
click ![]() at the top right of the main screen to expand the menu, and
click [Settings] below, then select [On] in [Auto Sync
Settings]. Once it is
connected to Wi-Fi or Data, it will automatically synchronize
every 5 minutes.
at the top right of the main screen to expand the menu, and
click [Settings] below, then select [On] in [Auto Sync
Settings]. Once it is
connected to Wi-Fi or Data, it will automatically synchronize
every 5 minutes.
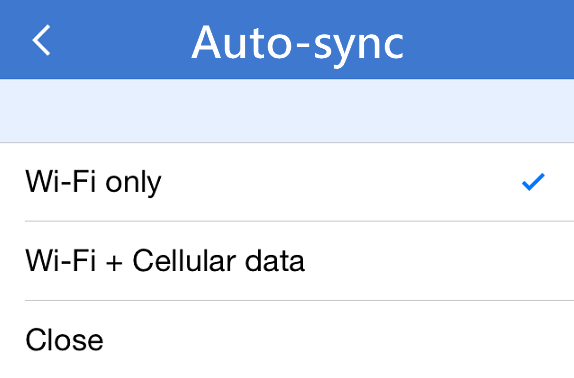
In order to save your data, you can select [Wi-Fi only] to run the synchronization. If you want to do synchronization manually, just select off.
If you have the permission to scan
business card for your colleague, please refer to the following steps:Click
Click the [Camera]
button to start taking the photo, and after confirming that the
recognitions are correct,
tap the
![]()
The contact data will disappear after sending to your colleague, and your colleague will receive a message notification. When your colleague synchronizes with the WorldCard Cloud server, the contact data you send to him/her will automatically download it to [My Contacts] for him/her to see the business card you helped him/her scan.
If other user shared a contact with you or if there is any changes in settings
of WorldCard Cloud, you will be notified. Please tap ![]() from
top right to open the selection screen to view the notifications.
from
top right to open the selection screen to view the notifications.
Once you tap on the selection list of notification, in the list of notification,
you will see all your related messages.
Slide right and left will allow you to view previous or next message.
These messages are not able to be deleted. However, once it reaches maximum of
500, the oldest message will be automatically deleted.
When the notification message is regarding a shared contact, you will see the
major part of the contact in the message, such as name, company and etc. Tap it
to select, and then tap on ![]() to download it directly into
[My Contacts].
to download it directly into
[My Contacts].
Please tap ![]() icon on the main screen to open the menu, then you can use the following
functions:
icon on the main screen to open the menu, then you can use the following
functions:
Unverified Contacts
If you use the way of batch shooting
/
loading
multiple card images to add contacts, those
contacts' data will be unverified. This function
will list all the unverified contacts for you to
check. There will be a ![]() mark on the unverified contact.
mark on the unverified contact.
Duplicate Contacts
This function will list all the contacts which have the same Name and Company Name, or have the same Name and Email, for you to delete or combine.
Contacts of the Same Name
This function will list all the contacts which have the same name for you to delete or combine.
Recent Contacts
Here it will list up to 30 of the contacts which you recently contacted for you to reach them again easily.
Nearby Contacts
Here will list all your contacts and the distance from the contact address to your current location.
Tap any contact to display that its location on the map, click
![]() on the contact from the map can start navigation with map or
app.
on the contact from the map can start navigation with map or
app.
Tap ![]() on the upper-right corner to go back to your current location.
on the upper-right corner to go back to your current location.
If you need to change user’s display name or login password, please tap
![]() from
upper left of the main screen to open the selection list, and then tap on
[User
Information] to make changes you need.
from
upper left of the main screen to open the selection list, and then tap on
[User
Information] to make changes you need.
If you need to change other settings of the app software, please
tap ![]() icon on the main screen to open the menu, and tap [Settings].
icon on the main screen to open the menu, and tap [Settings].
Contact Display
Eastern Name Display order: To decide the way how to display the contact with eastern name, you can choose to put the first name first and the last name last, or vice versa.
Western Name Display order: To decide the way how to display the contact with western name, you can choose to put the first name first and the last name last, or vice versa.
Index Order: You can use [Modified / Created Time] or [Name / Company Name] to sort the contacts in the contact list. If you use name or company name to sort, you can choose [English Alphabet], [Chinese ZhuYin], [Chinese Stroke], [Chinese Hanpin], [Japanese Phonetic], [Korean Phonetic], [Thai Phonetic] or [Swedish Alphabet] in the [Index Mode] to sort.
Telephone Number Display Format: The settings here for you to decide how to display the phone number in one specific format, E.g. to display as (+1 (510) 897-6600), or just display as (+15108976600). If you choose to use the specific format, you can choose [Add Country Code After Recognition] option to add country code in front of the phone number automatically.
Chinese Business Card Recognition Result: The settings provide a choice for you to save the Traditional / Simplified Chinese characters exactly the same as the original card, or to save them as all Traditional / Simplified Chinese characters no matter the original card is written in Traditional or Simplified Chinese characters.
Verify Information After Capture Business Card: If you turn on this option, you will be taken to the editing page after taking the photo for you to correct the information.
Add Notes After Capture Business Card: If you turn on this option, you will be taken to the note page to add information after taking the photo.
Sharing Settings
Auto Share: If WorldCard Cloud is set up as [Company-wide sharing] it is not able to make any change. If WorldCard Cloud is set up as “Sharing set up by users”, you can choose whether or not to allow automatic sharing. Or choose certain users from Shared Accounts to share automatically. If you want to stop sharing with certain users, just simply uncheck the option from the settings.
Sync Settings
Auto Sync: Please refer to [Synchronize with WorldCard Cloud Server].
Company CRM Settings
If administrator already enabled the function of data exportation to company CRM, please input all the login CRM information in the settings. You can choose either manually export to or automatically synchronize with the company CRM system. If you choose automatic synchronization, WorldCard Cloud will automatically synchronize with the company CRM system every 10 minutes.
If you choose manual exportation, please refer to the Chapter of “View and use contact information “for details. When you choose the destination of exportation, you will see Company CRM as one of the choices.
Company Address Book Settings
If administrator already enabled the function of data exportation to company address book, please input all the address book login information in the settings. You can choose either manually export to or automatically synchronize with the company address book. If you choose automatic synchronization, WorldCard Cloud will automatically synchronize with the company address book every 10 minutes.
If you choose manual exportation, please refer to the Chapter of “View and use contact information “for details. When you choose the destination of exportation, you will see company address book as one of the choices.
Dock Mode
Auto Capture: The settings here for you to choose if you need to use the auto capture function with WorldCard Mobile Phone Kit.
Information Management
Save to System Contacts: The settings provide a choice for you to save the new added contacts automatically into system contacts. You can make choice in System Contacts at the bottom. You can not active this function if you don't have the authority of exporting contacts.
Display Distance from the nearby contacts: The Unit to display distance from the Nearby Contacts, it can be switched between Kilometers and Miles.
Re-download: When you find the the contacts data or the number of contacts on the computer does not match with the WorldCard Cloud server, click the [Re-download] button. The software will delete all the data on the computer, and then download them all again from WorldCard Cloud server. This action will take some time, please wait patiently.
2021/10/01