
User Interface
Introducing
Add Contact
Edit Contact Information
Contacts Category Management
View and Use the Contact
Information
Synchronize Gmail Contacts
Advanced Functions
Settings
WorldCard Mobile provides many ways to add contact:
Using Camera
to Shoot Business Card
Scanning the Contact's QR Code
Import Contact File
Manually Establish Contacts
Add Contacts From the Email
Signature
Add Contacts From Picture
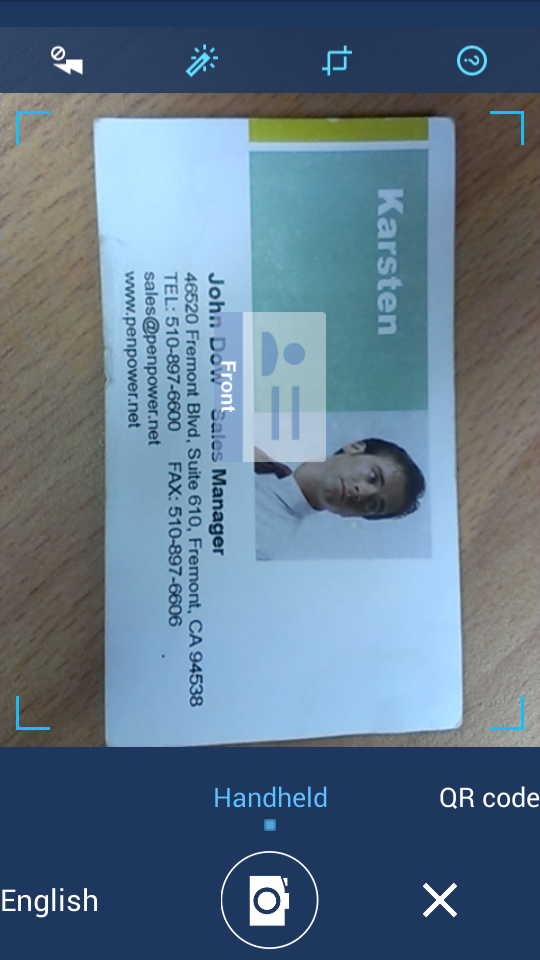
Using Camera to Shoot Business Card
After tapping the ![]() icon on the main page to launch camera, please
check the mode is selected on [Handheld] mode.
icon on the main page to launch camera, please
check the mode is selected on [Handheld] mode.
Next to the camera icon is
the [Recognize Language]
option, tap it to select the language you want
to use first, and then rotate your mobile phone
to portrait or landscape according to the
business card, and make sure the business card
image is fully loaded in the screen. Shoot above
the business card and try to avoid shadows as
possible, and then tap
![]() to shoot.
to shoot.
There are Flashlight ![]() ,
Lighten
,
Lighten ![]() ,
Auto Crop
,
Auto Crop ![]() functions on the screen for you to choose to
turn on/off the flashlight when shooting, or
lighten the picture automatically to make the
texts become more recognizable, or auto crop the
part outside of the
business card.
functions on the screen for you to choose to
turn on/off the flashlight when shooting, or
lighten the picture automatically to make the
texts become more recognizable, or auto crop the
part outside of the
business card.
After
shooting, you will see the result with lighten
and cropped in the next step, you can also tap
![]()
![]() to rotate the picture, if you are not satisfied
with result, please tap
to rotate the picture, if you are not satisfied
with result, please tap ![]() to shoot again.
to shoot again.
If the back side of the card
also has information, you can tap ![]() to add the picture of back side, then turn the
card to the back side and remember to choose the
correct language for recognize before shooting.
to add the picture of back side, then turn the
card to the back side and remember to choose the
correct language for recognize before shooting.
If you have lots of cards to be
managed, after shooting the first card (include
back side), you can tap ![]() to do batch shooting for you to shoot all the
cards in one time and then do the recognition in
the end.
to do batch shooting for you to shoot all the
cards in one time and then do the recognition in
the end.
Final step, tap ![]() to start recognition, and then you will see the
contacts appeared in the list.
to start recognition, and then you will see the
contacts appeared in the list.
Tap the
![]() icon to launch the camera, and slide the mode
to [QR
code] , and let the camera point to the QR code you want to
scan, WorldCard Mobile will focus and recognize
it automatically. If the shooting environment is
too dark, you can tap
icon to launch the camera, and slide the mode
to [QR
code] , and let the camera point to the QR code you want to
scan, WorldCard Mobile will focus and recognize
it automatically. If the shooting environment is
too dark, you can tap ![]() to enable the flashlight lights constantly.
to enable the flashlight lights constantly.
Tap the ![]() icon on the main screen, and choose
[Import File] to choose to import the contacts in the phone, or
import the contact files from the local storage
or cloud storage. Tap
icon on the main screen, and choose
[Import File] to choose to import the contacts in the phone, or
import the contact files from the local storage
or cloud storage. Tap ![]() to start importing after you select the files.
to start importing after you select the files.
The file formats that WorldCard Mobile supported are: WorldCard Exchange File (*.wcxf) and vCard file(*.vcf). When you choose to import from local storage, WorldCard Mobile will search and list all the usable files. Moreover, the first time you choose to import from cloud storage, it will ask you to enter the account/password of the cloud storage to access.
Tap the ![]() icon on the main screen, and choose
[Manually Enter] to enter the contact's information, and then
tap
icon on the main screen, and choose
[Manually Enter] to enter the contact's information, and then
tap ![]() icon on the the up-right corner to save.
icon on the the up-right corner to save.
Add Contacts From the Email Signature
Please select and copy the contact's Email signature in the Email first.
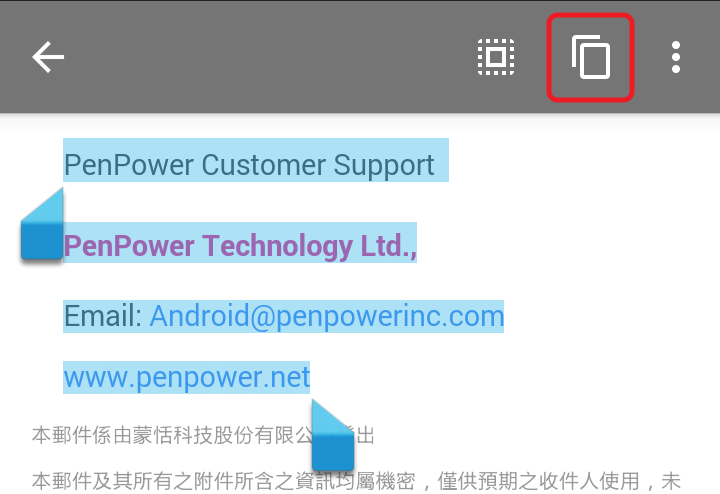
Open WorldCard Mobile, and
tap ![]() icon on the main screen to choose
[Email Signature] , the Email signature will paste into the
WorldCard Mobile automatically, and then tap
icon on the main screen to choose
[Email Signature] , the Email signature will paste into the
WorldCard Mobile automatically, and then tap ![]() to start recognizing.
to start recognizing.
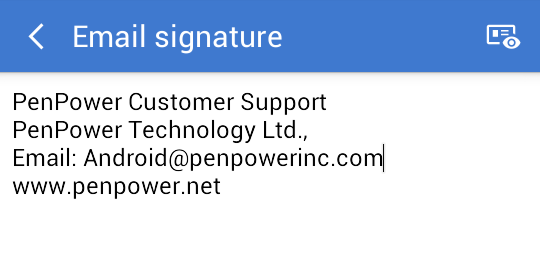
Note: If the pasted signature was mess, please adjust the paragraphs before recognizing.
Tap ![]() icon on the main screen to choose
[Add Contact from Album], and select the card images you want to
add, and then choose the recognize language on
the top of the screen, and then tap
icon on the main screen to choose
[Add Contact from Album], and select the card images you want to
add, and then choose the recognize language on
the top of the screen, and then tap ![]() to import and recognize, after that, tap
to import and recognize, after that, tap ![]() icon on the up-right corner to save.
icon on the up-right corner to save.
Note: After adding new contacts, you can still add/change the contact's card image and partial the information on the card image to recognize, and also add notes for the contact. Please refer to the next chapter for more details.
Edit Text Information
After you add a new contact by shooting or your
contacts information have changed, you will need
to edit your contacts information; Please tap
the contact you are going to edit to enter the
detail information page, and tap ![]() icon on the up-right corner, and then choose
[Edit]] to enter editing page.
icon on the up-right corner, and then choose
[Edit]] to enter editing page.
If you use the way of batch shooting/loading
multiple card images to add contacts, you will
see a mark ![]() on those contacts which mean the contacts
information has not been verified, and you can
just tap them to enter the editing page to
confirm.
on those contacts which mean the contacts
information has not been verified, and you can
just tap them to enter the editing page to
confirm.
When you tap the field you want to edit, the original image area which belongs to that field will appear on the top of the screen for you to double check, please note this feature only available on the contacts which are added by shooting via this mobile device, it is not available if the contact is imported from somewhere else.
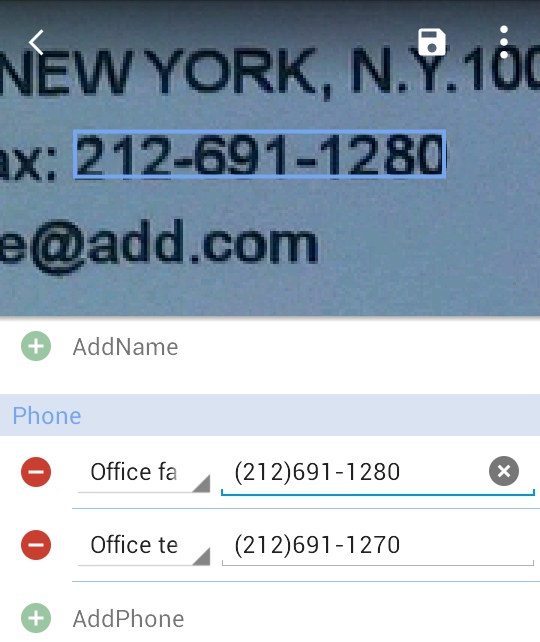
In the editing page, tap ![]() /
/
![]() to add/delete any field, also you can change
the field label, E.g. you can change the phone
number from [Home] to [Office], moreover you can
tap
to add/delete any field, also you can change
the field label, E.g. you can change the phone
number from [Home] to [Office], moreover you can
tap ![]() on the up-right of the screen to open the menu,
and then tap
on the up-right of the screen to open the menu,
and then tap ![]() to change the card image.
to change the card image.
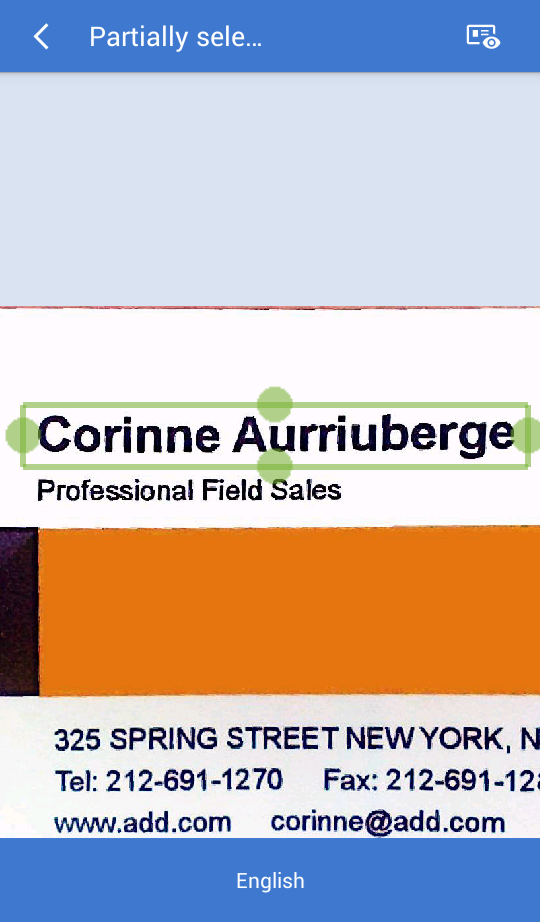
If there is a field information didn't be
recognized, you can tap ![]() on the up-right of the screen to open the menu,
and then tap
on the up-right of the screen to open the menu,
and then tap ![]() to open partially select function, at this time
you can use two fingers to enlarge the picture,
and then move and scaling the green frame on the
image to select the information you want to
recognize, after that, choose the recognize
language at the bottom, and tap
to open partially select function, at this time
you can use two fingers to enlarge the picture,
and then move and scaling the green frame on the
image to select the information you want to
recognize, after that, choose the recognize
language at the bottom, and tap ![]() on the up-right corner, many kinds of fields
will be listed for you to choose what field does
the partially selected information belongs to,
and then WorldCard Mobile will recognize and
enter the information into the filed you decide
automatically.
on the up-right corner, many kinds of fields
will be listed for you to choose what field does
the partially selected information belongs to,
and then WorldCard Mobile will recognize and
enter the information into the filed you decide
automatically.
If you are willing to partial the information at
the back side of the card, just tap ![]() icon to change to back side card image.
icon to change to back side card image.
After editing, please remember to top ![]() to save。
to save。
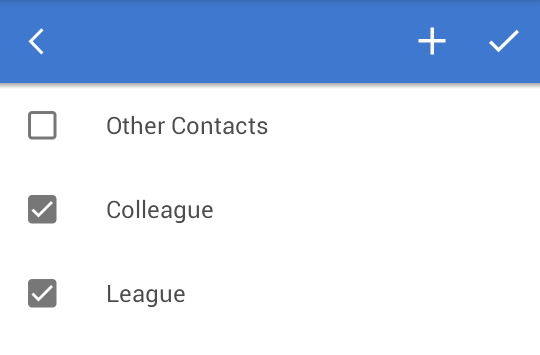
Categorize Your Contacts
There is a [Category] item at the bottom of contact information page, tap it then you can modify this contact's category.
Edit Card Image
Tap a contact to enter information page, and tap
the card image to enter card image viewing mode.
her you can rotate the image, refresh or
add back side card image, tap ![]() icon can delete the image or choose [Image
Process].
icon can delete the image or choose [Image
Process].
In the image process page,
you can tap ![]() to lighten the image to make the texts become
more recognizable, and move and scaling the
green frame in the image to select the card, and
then tap
to lighten the image to make the texts become
more recognizable, and move and scaling the
green frame in the image to select the card, and
then tap ![]() to cut off the extra parts outside the card
image, after that, tap
to cut off the extra parts outside the card
image, after that, tap ![]() to save the changes.
to save the changes.
If the contact has no card
image, tap ![]() can add a card image for this contact.
can add a card image for this contact.
By creating many kinds of categories,
you can categorize your contacts for better management. Tap ![]() icon on the up-left corner of main screen to open the category menu.
icon on the up-left corner of main screen to open the category menu.
Add New Category
Tap ![]() on the category menu to enter category setting page, and tap
on the category menu to enter category setting page, and tap ![]() icon to enter the new category name, and then tap [OK] to save.
icon to enter the new category name, and then tap [OK] to save.
Modify/Delete Contacts
In the setting page, tap a category can edit the name, and
also you can hold the ![]() to drag to change the category's order, or tap
to drag to change the category's order, or tap ![]() to delete a category.
to delete a category.
Note: If you delete a category, all the contacts in that category will become [Other Contacts].
View and Use the Contact Information
After establishing your own contacts, you can review and use these contact information anytime.
If
you have lots of contacts, you can use the full text search
function ![]() to find your data, you can enter any keyword of any field, and
it will list all the results.
to find your data, you can enter any keyword of any field, and
it will list all the results.
When you review the contact information, you can tap the following icons to trigger the related functions:
Phone ![]() : Tap to call this contact or tap
: Tap to call this contact or tap ![]() to send text.
to send text.
Email ![]() : Tap to send Email to the contact.
: Tap to send Email to the contact.
Address ![]() : Tap to open the map to search the contact's
address.
: Tap to open the map to search the contact's
address.
Web Page ![]() : Tap to open the contact's web page.
: Tap to open the contact's web page.
If the contact's card has double sides
information, tap ![]() to switch the card image to the other side.
to switch the card image to the other side.
Tap ![]() icon on the up-right corner of the screen to add note for this
contact, and then tap
icon on the up-right corner of the screen to add note for this
contact, and then tap ![]() to insert the current date for you to do a record. In addition,
tap
to insert the current date for you to do a record. In addition,
tap ![]() icon to open the menu for you to search the contact on social
websites, or share the contact information to other people, also
you can edit/delete the contact information or recognize it
again.
icon to open the menu for you to search the contact on social
websites, or share the contact information to other people, also
you can edit/delete the contact information or recognize it
again.
If a contact is your closed friend or the
person you contact very often, you can tap ![]() to add this contact into your favorite list. In the Favorite
list, you can tap
to add this contact into your favorite list. In the Favorite
list, you can tap ![]() to call immediately, or tap
to call immediately, or tap ![]() to sort the favorite contacts to put the most used contacts to
the top, or tap
to sort the favorite contacts to put the most used contacts to
the top, or tap ![]() to search contacts.
to search contacts.
Tip: Tap ![]() again to remove the contact from the favorite list.
again to remove the contact from the favorite list.
Also when in the main page, you can tap ![]() icon to select the contacts, and then tap
icon to select the contacts, and then tap ![]() /
/ ![]() to send Email or text to the selected contacts, you can also tap
to send Email or text to the selected contacts, you can also tap ![]() to modify the contact's category or tap
to modify the contact's category or tap ![]() to share the contacts information to other people.
to share the contacts information to other people.
Tap ![]() icon to open the menu of deleting or exporting the contacts.
icon to open the menu of deleting or exporting the contacts.
Through Gmail contacts sync functionality to keep your contacts on the cloud account updated, therefore, no matter where you are, if you can access your Gmail contact, you will be able to get the latest information. If you have other PenPower WorldCard series products on other platforms, you can also sync the latest contacts information to all the platforms via your Gmail contacts.
Please tap ![]() icon on the main screen to open the menu, and tap [Sign In] to
enter your Gmail account/password, and then accept the
authorizations that
WorldCard Mobile asked for.
icon on the main screen to open the menu, and tap [Sign In] to
enter your Gmail account/password, and then accept the
authorizations that
WorldCard Mobile asked for.
Before having the first synchronization, please tap [Auto Synchronization Setting] choose to let WorldCard Mobile sync with Gmail contacts automatically when there is Wi-Fi or mobile network connected, or when only Wi-Fi connected can do the synchronization.
After setting, tap
![]() or drag down
the screen when in the contacts list, the WorldCard Mobile will
start to sync.
or drag down
the screen when in the contacts list, the WorldCard Mobile will
start to sync.
Note: After first syncing, the category list will be added a few default categories that belongs to Gmail contacts, please note these categories are not able to be deleted.
Please tap ![]() icon on the main screen to open the menu, then you can use the following
functions:
icon on the main screen to open the menu, then you can use the following
functions:
Unverified Contacts
If you use the way of batch
shooting/loading multiple card images to add
contacts, those contacts' data will be
unverified, this function will list all the
unverified contacts for you to check. There will
be a ![]() mark on the unverified contact.
mark on the unverified contact.
Duplicate Contacts
This function will list all the contacts which have the same Name and Company Name, or having the same Name and Email for you to delete or combine them.
Recent Contacts
Here will list the contacts up to 30 that you recently contacted for you to reach them again easily.
Nearby Contacts
Here will list all your contacts and the distance of contact address with your current current location.
Tap any contact to display that contact's
location on the map,
click
![]() of contact on the map can start navigation.
of contact on the map can start navigation.
Tap ![]() on the upper-right corner to go back to your current location.
on the upper-right corner to go back to your current location.
Backup/Restore
Please remember to backup your data regularly to ensure the data's safety, you can choose to save the backup file to local storage or cloud storage like Dropbox, Google Drive, DBank.
If you are going to save the file in the local storage, just tap [Start to Backup] to continue; if you choose to save in cloud storage, then it will start to back up after you enter the account/password of the cloud storage.
If you got backup files in the cloud storage, you can download the file back anytime even you change to a new phone; if you save it in the local storage, just transfer the file to your new phone, you can also restore it on the new phone.
Please tap ![]() icon on the main screen to open the menu, and tap [Settings].
icon on the main screen to open the menu, and tap [Settings].
Contacts Display
Information Management
2016/01/20