Phone2PC User Manual
Install software on
PC
Start to Use
- Voice Typing Function
- Translation Function
- Mouse Function
- Slide Presentation
Function
- Document Signing
Function
- Voice2Text Function
Software Settings
Install software on PC
Please plug Phone2PC USB Bluetooth
receiver to the computer, and open Phone2PC APP on the phone. Please turn on the
Bluetooth function if you were asked to, and the APP will pop up a guideline for
software downloads, please follow the steps to download and install the PC
software.
Or later you can click  / [Settings] / [PC software download] in the APP to install the software.
If you cannot properly install with the guidelines, please
download the Phone2PC PC software via the following URL depending on your
computer system.
Windows:
http://mobile.penpower.net/download/Phone2PCW
Mac:
http://mobile.penpower.net/download/Phone2PCM
Back to
menu
Start to
Use
Before using Phone2PC, please remember to launch the PC software first,
and then open the Phone2PC APP; At this point your phone will ask to
turn on Bluetooth function as well , and once the Bluetooth function is turned
on, your phone will automatically connect with the receiver.
When the connection is established, you will see
[connection success] message appears on the PC software, and APP's Bluetooth
icon will become  from
from  .
.
Phone2PC requires network connection on your phone and PC,
if your phone has network usage restrictions, please switch to Wi-Fi to get
better user experience, and also avoid to reduce the network usage after
long-term use.
◎ Voice Typing Function
Tap  on the main page of APP, the
  icon on the PC software will light up, and the [Simple Editing Toolbar] will
appear as well for you to edit the sentences you entered;
icon on the PC software will light up, and the [Simple Editing Toolbar] will
appear as well for you to edit the sentences you entered;
Open any text editing software you want to use, such as MS Word, and click
the cursor to the input area.
- Tap Voice Input
 and tap
 to choose the language you want to speak and recognize.
- The microphone button
 will become Green when you tap it, and at this
point you can start to talk to your phone's microphone; When the
program detects you stop talking, or when it comes to a certain
length, the microphone icon will turns Red and
start the voice recognition. Please wait for the microphone icon
turns Green again, which means the recognition
is done, then you can start to talk again.
will become Green when you tap it, and at this
point you can start to talk to your phone's microphone; When the
program detects you stop talking, or when it comes to a certain
length, the microphone icon will turns Red and
start the voice recognition. Please wait for the microphone icon
turns Green again, which means the recognition
is done, then you can start to talk again.
Microphone icon (Green): Start
talking.
Microphone icon (Red): Stop talking, your voice is under recognizing.
Tips: You can tap the microphone icon
to pause or resume talking anytime.
- If you want
to use typing ways to send text to your computer, please tap
Keyboard Input
.png) ,
and then use the keyboard to type.
,
and then use the keyboard to type.
- Tap
 on the upper-right corner to switch Auto/Manual mode of sending
out texts; Please remember to tap [Submit] button on the screen
to send out the texts when you in manual mode.
on the upper-right corner to switch Auto/Manual mode of sending
out texts; Please remember to tap [Submit] button on the screen
to send out the texts when you in manual mode.
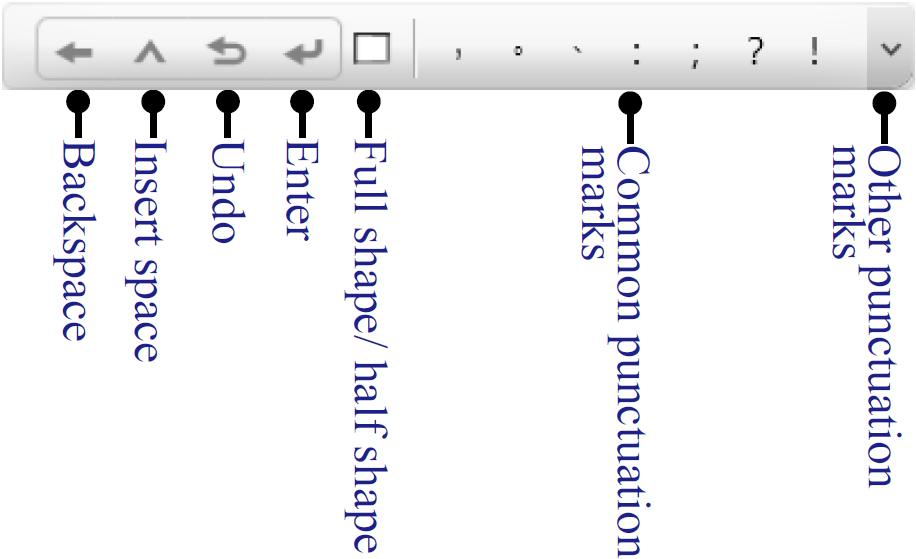
- The [Simple Editing Toolbar] can help you to switch the Full
shape/Half shape of the texts you sent out, and insert the
common punctuation marks, also insert space and others, for you
to complete the inputs.
- Tap Voice Input
and tap
to choose the language you want to speak and recognize.
-
The microphone button
will become Green when you tap it, and at this
point you can start to talk to your phone's microphone, and it
will recognize your voice in real time; Remember to tap [Submit]
button to send the texts to PC when you are done of talking.
Note: Maximum length of the
iPhone recording is up to about 40 seconds, then it won't record anymore, so
remember to send the results out if it stopped recording, then tap the
microphone icon to continue.
Back to
menu
◎ Translation Function
- Click
 on PC software, then choose the language you want to speak and
recognize in the drop down menu at the top of the window, and
then choose language you want to translate in the drop down menu
at the bottom of the window.
on PC software, then choose the language you want to speak and
recognize in the drop down menu at the top of the window, and
then choose language you want to translate in the drop down menu
at the bottom of the window.
-
Please refer to the previous instructions of [Voice Input], and
use the voice input function, and click the mouse to the top of
the text area, the program will automatically send the recognize
results from your phone to the translation area, that provide
the translation instantly.
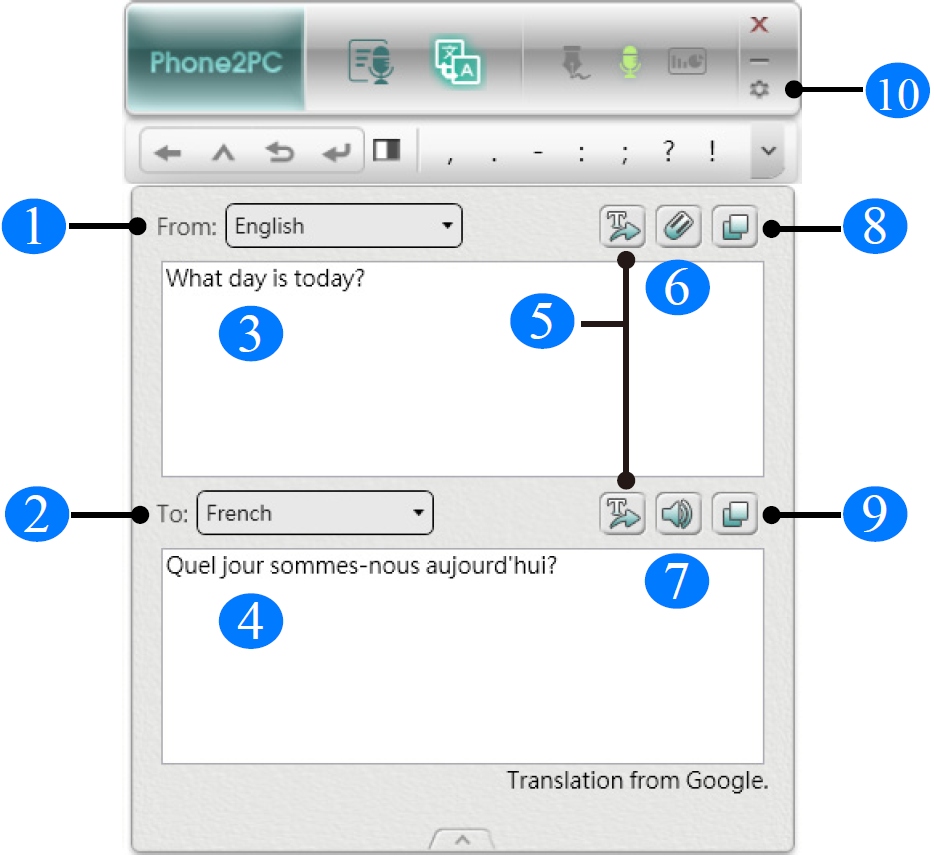
| 1 |
Input language |
6 |
Clear texts |
| 2 |
Translation language |
7 |
Pronunciation |
| 3 |
Text area |
8 |
Copy original texts |
| 4 |
Translation area |
9 |
Copy translated texts |
| 5 |
Send out texts to application |
10 |
Settings |
Tips:
- Please insert the punctuation mark correctly
in order to get the best translation result. In
addition to typing through the [Simple Editing
Toolbar], you can also use the [Convert specific
symbols] function in the PC software setting to
"talk" punctuations.
- To leave the
translation mode, click the [Hide] button
 at the bottom edge of the software window.
Back to
menu
◎ Mouse Function
Phone2PC also provides mouse function, whether you are sitting on the sofa
listening to music or lying in bed to see the film, you can easily remote
through the phone to control computer.
- Tap
 ,
then you don't need to open the PC software and take the phone
as a mouse, and control the computer by moving finger in the
operation area of middle of the screen.
,
then you don't need to open the PC software and take the phone
as a mouse, and control the computer by moving finger in the
operation area of middle of the screen.
- Below the screen, there are two
buttons

 that correspond to the Left/Right button of mouse, and
single-tap or double-tap in the operation area of middle screen
can also correspond to the single-click or double-click of left
mouse button.
that correspond to the Left/Right button of mouse, and
single-tap or double-tap in the operation area of middle screen
can also correspond to the single-click or double-click of left
mouse button.
◎ Slide Presentation Function
In addition,
 can turn your phone into a presenter to control your slides. (PC software needs
to be opened)
can turn your phone into a presenter to control your slides. (PC software needs
to be opened)
- After taping the
slide presentation function on the phone, the icon
 on the PC software will light up, please select the slide
presentation software you use, such as MS PowerPoint, and select
your screen ratio; if you need countdown reminders, please
enable [Timing] function, and tap
on the PC software will light up, please select the slide
presentation software you use, such as MS PowerPoint, and select
your screen ratio; if you need countdown reminders, please
enable [Timing] function, and tap  to set the length of countdown time.
-
Once you have set it, click the [START] button below to make
your slide start to play. You can long press the operation area
of middle screen to trigger the [Laser] function. Moreover, you
can use your finger to slide left/right in the operation area to
switch the next/previous page.
- Tap
 on the upper-right corner can temporarily turn off the slides if
you need the audience focused on you, tap again to return.
on the upper-right corner can temporarily turn off the slides if
you need the audience focused on you, tap again to return.
- If you want to leave the slide
presentation, just tap
 .
.
Back to
menu
◎ Document Signing Function
Document signing function allows you to sign in PDF, Word, Excel and other
format files, also can let you digitalize the document by taking pictures, and
send to PC to for you sign.
- Tap
 on the main page of APP, the icon
  on the PC software will light up, and you phone will enter the
signing mode, please tap
on the PC software will light up, and you phone will enter the
signing mode, please tap  button to start signing.
Note: On Windows, Phone2PC only
supports Adobe v11.0.8 and above version / Foxit v6.0 and above version PDF
document software; On Mac, Phone2PC only supports Adobe DC version PDf document
software. If you use Phone2PC with Windows MS Office 2007, please update it to
Service Pack 3 suite.
- You can tap
 to switch thin/thick stroke and tap to change color; tap
  to change color; tap
  to clean the stroke to re-write.
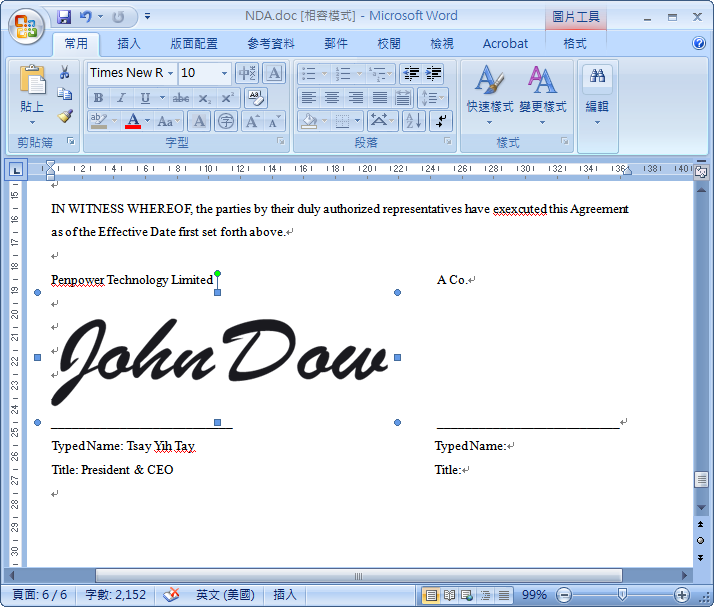
-
Tap [Send] on the up-right corner when you finish signing, and
soon you will see the signature pasted on your document, you can
enlarge/shrink the signature, or drag it to change the position,
and then save the document to finish.
After signing, you can tap  to
set the template of signature before you sign, and you can choose to attach the
date of signing or your digital name.
to
set the template of signature before you sign, and you can choose to attach the
date of signing or your digital name.
-
First of all, tap
 to set your [Digital name], and after that you can tap
  to add the date of signing, or tap
  to add digital name. Meanwhile, you can tap
  to set the font of name and date as [Bold], [Italics] or
[Underline], also you can tap
to set the font of name and date as [Bold], [Italics] or
[Underline], also you can tap  to set the sequence of date and name.
- Moreover, you can drag the
border of digital name and date to shrink or enlarge the size by
tapping
 ,
or hold press the digital name and date to move the position.
,
or hold press the digital name and date to move the position.

Note: If you use Adobe PDF software to
open the document which you are going to sign, the template of digital name and
date will be displayed as watermark as the sample below.

The [Text Information] can help you to send the texts
you use quite often into documents on PC.
- Please tap
 in the main page on E-signature, and tap [Edit] to add the
information; The are default items like [Name], [Address] and
[Company Name]. The attached digital name in the template of
signature is the [Name] item here, please tap any item to start
editing.
in the main page on E-signature, and tap [Edit] to add the
information; The are default items like [Name], [Address] and
[Company Name]. The attached digital name in the template of
signature is the [Name] item here, please tap any item to start
editing.
- Tap
 can add more information fields; If you need to delete any
field, just tap
can add more information fields; If you need to delete any
field, just tap  .
.
- Afterwards, when you sign or edit any
documents, just enter this list page, and tap the [Send] button
next to the information item you want to insert, and the texts
will send to the document instantly.
- If you are using Phone2PC with the
Adobe PDF software, please click [Sign] on the Adobe PDF
software and click [Add text] item, and then move the mouse
cursor to the place where you are going to add the text
information, then tap the text information on the phone to send
out.
- Document Digitization and Signature
Phone2PC also provides document digitization function, just take a picture
for the document you want to sign, the APP will convert the pictures into a PDF
file, and send to PC through the cloud storage space for you to sign.
- Please tap
 on the main page of [E-Signature] top open camera, and you can
tap
on the main page of [E-Signature] top open camera, and you can
tap  first to turn of the Flash Light
  ,
Auto Lighting
,
Auto Lighting  and Auto Crop
  functions.
- After shooting, you
can tap
 and
and  to rotate the image, or tap
  to turn the image to gray or black and white; If you need to
discard, please tap
to turn the image to gray or black and white; If you need to
discard, please tap  and shoot again.
- Please tap
[Finish] on the upper-right corner to save the image, if you
would like to keep adding images, please tap
 ,
and you will see a number increasing next to the [Finish]
button.
,
and you will see a number increasing next to the [Finish]
button.
- After tapping [Finish] button, the options of [Dropbox] and
[Google Drive] will pop up, please choose the cloud storage
space you want to use. First time accessing the cloud storage
space, it will ask you to log in, please log in with your
account and password, then your PDF file of documents will be
sent to PC through the cloud storage space.
- On Windows, the PDF will be automatically opened once
transferred to PC for you to sign, and the APP will also enter
the signing mode; On Mac, the PDF file will be opened by
browser, please save the PDF file to local.
- All the used documents and signatures will be saved in a
specific place, for Windows, the data will be saved in
[Phone2PC] folder under [My Document], and for Mac, the used
signatures will be saved in [All My Files] under [Favorites].
Tips: If you want to change the cloud
storage space or switch to another account, please tap  on the main page of E-Signature to log out, and then you can log in again with
another account.
on the main page of E-Signature to log out, and then you can log in again with
another account.
Back to
menu
◎ Voice2Text
Function
When you join an interviewing or
listening to a class, the Voice2Text function can help you record your files and
transfer them to your computer to convert them into editable text, help you to
write reports or press words. Before recognizing the recording file,
please click  on the PC software first, and you will be asked to install additional
necessary components. Please follow the instructions on the screen to complete
the installation.
on the PC software first, and you will be asked to install additional
necessary components. Please follow the instructions on the screen to complete
the installation.
- Tap
 on the main page, and tap
button to start recording, and tap it again can pause the
recording; If you want to cancel, tap
on the main page, and tap
button to start recording, and tap it again can pause the
recording; If you want to cancel, tap  .
.
- After recording, click the [Finish] button below, the
recording file will automatically saved to the default path of
the phone, and ask if you want to send it to the computer for
recognition.
-
If you want to recognize the currently recorded file, please tap
[Transfer to PC] button, and choose the [Recognize Language],
and at this point, the APP will remind you to connect to Wi-Fi
to create a file transfer route.
-
If you don't want to do the recognition
now, just click [Cancel] button, the recording file will still
save in the phone, and later you can tap
 button in the APP [Voice2Text] page to choose recording file to
send again.
button in the APP [Voice2Text] page to choose recording file to
send again.
Tips:
- On Android phone, you can listen to the
contents of the recording while selecting the
recording file, and the iPhone can click the
[Play] button below to listen.
- To delete recording file, on iPhone, please
slide the recording file from right to left in
the selected recording screen, and tap the the
[Delete] button; On Android phone, please use
the file manager in the phone to open the [root
directory\sdcard\Phone2PC folder] to delete the
file.
- Before transferring a recording to your computer,
please connect your phone to a Wi-Fi network, and fill in Wi-Fi
password of the same Wi-Fi name that shown on the screen, and
then click the [GO] button.
Note: When there is any asking dialog
of firewall appears on the PC, please click [Allow] to allow the establishment
of the route.
- At this time, Phone2PC will automatically help you
switch the computer network to the same Wi-Fi network as your
phone connected (Wi-Fi function on PC must be turned on first),
and the transmission route will be established.
- If your computer does not have wireless network function, as
long as the cable network your computer connected is the same
network segment of the network as your phone Wi-Fi network, then
it can be used as well, and do not need to enter any Wi -Fi
password, just click the [GO] button to continue.
- When the transmission route is established, the recordings
on the mobile phone will be transmitted to the PC, and based on
the language you set to recognize, and then display the results
for you to confirm.
Reminder:
- If you cannot establish the connection due
to any issue, please copy the recording files
from your phone to your PC, then tap
 on the [Voice2Text] page of PC software, and
select the recording file you want to recognize,
and set correct [Recognize Language] to start
recognizing.
on the [Voice2Text] page of PC software, and
select the recording file you want to recognize,
and set correct [Recognize Language] to start
recognizing.
- On iPhone, please use the iTunes software to
obtain the recording file; On Android phone,
please find the recording files in the [root
directory \ sdcard \ Phone2PC folder].
- If you need to correct any
wrong texts, please click on that text paragraph, it will open
an edit window for you to edit, you can click the
 button on lower left corner to listen to the contents again, and
click [Finish] to complete the correction.
button on lower left corner to listen to the contents again, and
click [Finish] to complete the correction.
Note: Considering the performance of
transferring and recognizing the recording files, it is recommended that the
maximum recording time is 60 minutes, and the volume is too low or the sound
source is not clear will affect the recognize results.
- After checking the results,
you can click
 button to save the results, or open any text editor like MS
Word, and click the mouse to the text editor, then click
button to save the results, or open any text editor like MS
Word, and click the mouse to the text editor, then click  to send the results out to the text editor for other purposes.
- Move the mouse cursor to the
 above the recognition result, it will show the information of
recording file, you can click
button next to it to play the recording file, or click the
button to open the storage location.
above the recognition result, it will show the information of
recording file, you can click
button next to it to play the recording file, or click the
button to open the storage location.
Back to
menu
Software Settings
◎ Windows / Mac
Click  on the upper right corner of PC software to open software settings.
- On [General] page, you can change the display language of
software and the storage path of recording files, also you can
let the software comes up automatically while system boot up.
- On [Voice2Text] page, you can select the commonly used
languages and change the order in the drop-down menu when
recognizing a recording file. You can also change the voice
recognition engine here.
- On [Translation] page, you can change the translation engine
here to Baidu Translation or Google Translation.
- On [Voice Input] page, you and adjust the font size in the
translation window (Not supported on Mac), and you can also
enable the [Convert specific symbols] function:
- If you enable [Convert specific symbols]
function, the software will automatically
convert the recognition result of punctuation to
text. For example, the recognized results
[question mark] will be converted to [?], for
you to easily insert the punctuations by
speaking.
- In addition, [Convert specific symbols]
function supports simple voice actions. For
example, when you say [Delete Forward], then the
software will execute [Backspace] action for
you.
- Please click [Symbol/Command list] button
for more details.
- On [Sign setting] page, if you tick [Fill in] option, then
when you sign in MS Word or Excel form, the signature will be
automatically fit the size of the table.
◎ Android / iPhone
Tap
on the main page to open menu.
- Search Bluetooth receiver: Search and list all the idle
Phone2PC devices, tap the device which you want to use to
connect.
- Forget this device: Tap to forget the connected Phone2PC
device.
- PC S/W download guide: Open the guide of downloading PC
software.
- PC connection test: Tap this option to test the connection
quality with PC. If there is no success message pop up on the PC
software, please check the connection between the hardware is
correct.
- Settings (Android only):
- Speech engine settings: You can change the
translation engine between Baidu Translation and
Google Translation.
- Voice recognition settings: You can manage
the offline recognition languages here.
- Sound effect: You can turn the sound effect
on or off when using voice input function. This
sound is made for you to identify the current
phone status is recording or recognizing.
- Recording position: The location information
will be added in the recording file name if you
turn on this function.
- Open recorded file folder: Help you open the
folder location where the recordings are stored.
Back to
menu
2017/10/05