After the recognition of the card, you can tap [Card
Holder] to find the recognized and
unverified contacts in the list mode.
-
Notes:
If you can't use automatic capture function in the dock mode
normally, please capture the cards' images manually. Tap
 on the home
page and go to [Dock] to uncheck the automatic function so as
to use manual capture function in the dock mode.
on the home
page and go to [Dock] to uncheck the automatic function so as
to use manual capture function in the dock mode.
Return to Content
b. Create contacts from camera
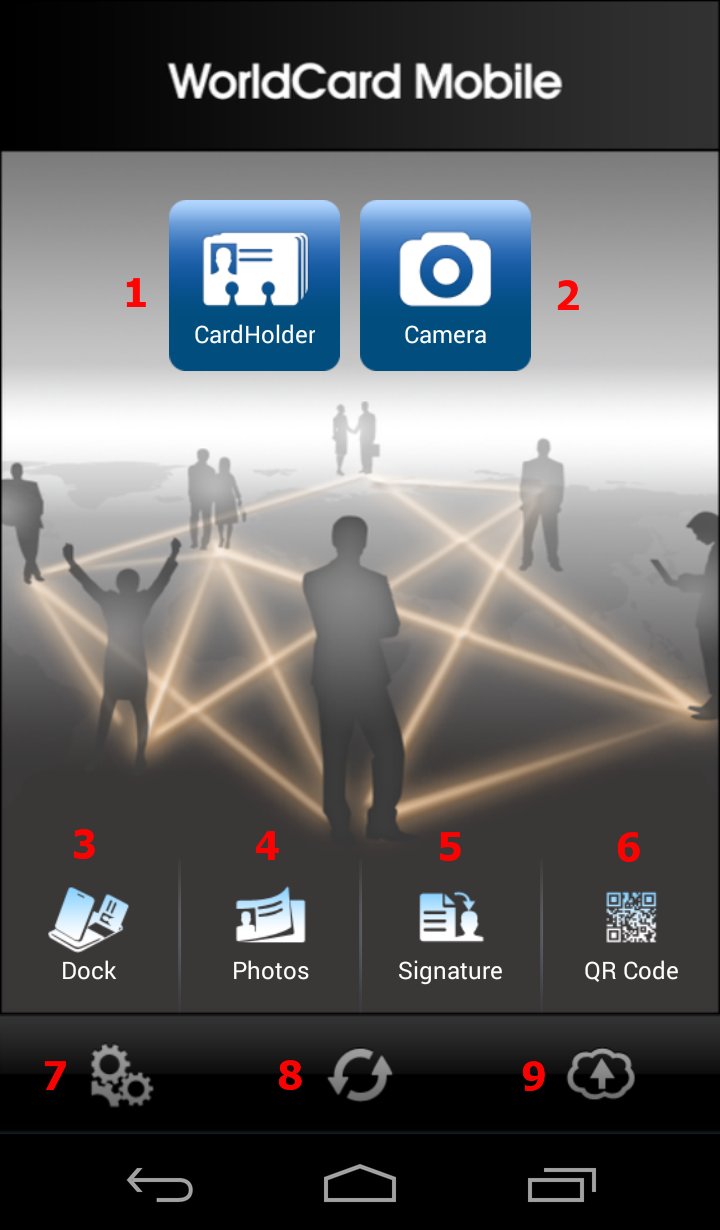
1. Tap  in the main screen or tap
  in Card Holder and select [Camera].
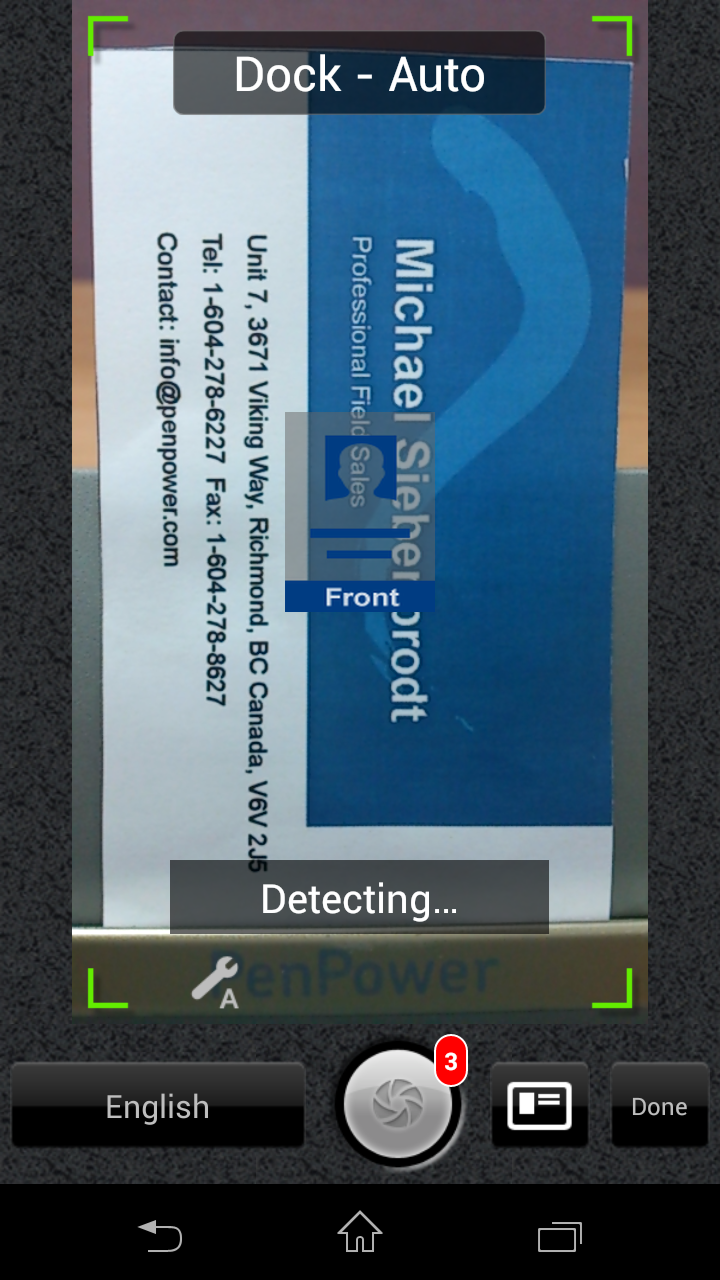
2. Rotate your mobile phone to landscape mode and make sure the business card image is fully loaded in the screen.
Tip: If the text in your business card is vertical, please also rotate your mobile phone to landscape mode to capture the image.
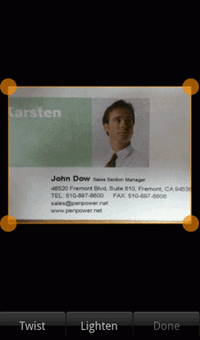
3. Get the camera to focus before taking the photo by touching the
screen.
Tip A: Tap Image Process  to select a function to optimize your photo.
-
 :No image process.
-
 :Twist the photo.
-
 :Lighten the photo.
-
 :Twist and lighten the photo automatically.
Tip B: Tap flash mode(where exists) to select Auto  , On
, On  , or Off
 to get a clear light.
4. Tap  to take a picture of the business card.
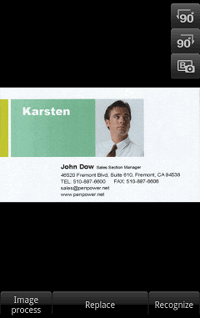
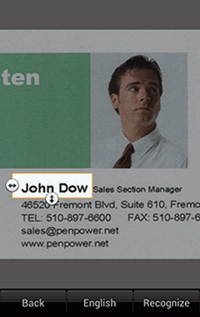
5. Preview the image.
Tip: Tap  or
or  to rotate the photo.
6. Tap the language button to select a proper recognition language. WorldCard Mobile supports English, Traditional Chinese, Simplified Chinese, Hong Kong, Japanese, and Korean.
7. Tap [Done] to recognize this card image. If you want to recognize the back side of the business card, just tap  icon to capture the back side image and the contact information on it will be recognized also. If you want to recognize more images, just tap
  icon to recognize next business card.
Tip: The number beside [Done] icon displays how many card images have been recognized but unedited.
8. If you only recognize one card image, you can confirm and edit the contact info once the recognition is completed. If you recognize more than one image, you will see those card images shown with  label in the card holder after
reorganization. Tap them to confirm and edit. To learn more about how to edit the recognition result, please refer to edit a contact.
label in the card holder after
reorganization. Tap them to confirm and edit. To learn more about how to edit the recognition result, please refer to edit a contact.
Tip:
In Card Holder, the contact with a label means the contact is unverified. You can also find all the unverified contacts in the [unverified] group.
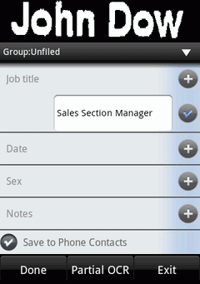
9. Tap [Done] to save your new contact to Card Holder.
Tip: Check the option of [Save to Phone Contact], and you can also save this contact to phone's [Contacts] app, your Google or Exchange account at the same time.
Return to Content
c. Create contacts from existing photo
1. Tap  in the main screen or tap in Card Holder and select [Choose Existing Photo].
2. Choose a business card image from the Gallery app.
3. Preview the image.
Tip: Tap or to rotate the photo.
4. Tap  to lighten or twist your card image. Please refer to section lighten or twist the card image.
5. Tap the language button to select a proper recognition language. WorldCard Mobile supports English, Traditional Chinese, Simplified Chinese, Hong Kong, Japanese, and Korean.
6. Tap [Recognize] to recognize this card image.
Tip: To discard or choose another picture, press the Back button on the phone to return to the previous screen without saving the card image.
7. After the recognition is completed, confirm or edit your contact info. To learn more about how to edit the recognition result, please refer to edit a contact.
8. Tap [Done] to save your new contact to Card Holder.
Tip: Check the option of [Save to Phone Contact], and you can also save this contact to phone's [Contacts] app, your Google or Exchange account at the same time.
Remember to select different Gmail account from the sync account to save the
contacts.
Return to Content
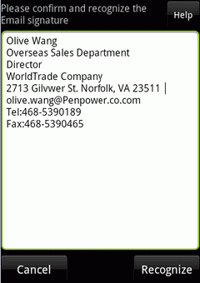
d. Create contacts from email signature
1. Open any document with email signature information (ex. Gmail).
2. Select and copy the text that you want to recognize in the email signature section.
3. Return to WorldCard Mobile and tap the
 icon or tap in Card Holder and select [eSignature].
4. Tap [Recognize]. WorldCard Mobile will recognize the text you have chosen and then automatically build the contact info according to the attribute of each column.
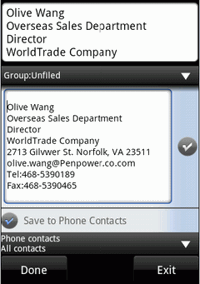
5. After the recognition is completed, confirm or edit your contact info. To learn more about how to edit the recognition result, please refer to edit a contact.
6. Tap [Done] to save your new contact to Card Holder.
Tip: Check the option of [Save to Phone Contact], and you can also save this contact to phone's [Contacts] app, your Google or Exchange account at the same time.
Remember to select different Gmail account from the sync account to save the
contacts.
Return to Content
e. Create a contact manually
1. Tap in Card Holder and select [Add a contact manually].
2. Enter contact information in corresponding fields.
3. Tap [Done] to save your new contact to Card Holder.
Tip: If you don't add a card image when manual key in, WorldCard
Mobile will auto generate a virtual card image.Return to Content
f. Import from WorldCard file (.wcxf)
If you have .wcxf file stored in you SD card, you can import the contacts.
1. Tap in Card Holder and select [Import WorldCard file(*.wcxf)].
2. Select a .wcxf file from the import file list and tap [OK].
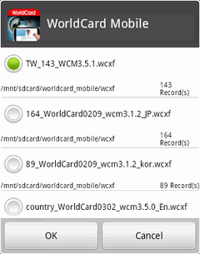
3. If you want to specify a group for the contacts in the .wcxf file, please tap [OK] and then pick a group from the list.
Notes:
4. Then the contacts will be imported right away.
Return to Content
g. Import vCard file (.vcf)
If there is any .vcf file in the SD card,
you can open the vCard file directly with WorldCard Mobile, or import the vCard
file in the WorldCard Mobile.
1. Tap in the card
holder, and select [Import vCard(.vcf)].
2. Choose the file you want to import and tap [OK].
Return to Content
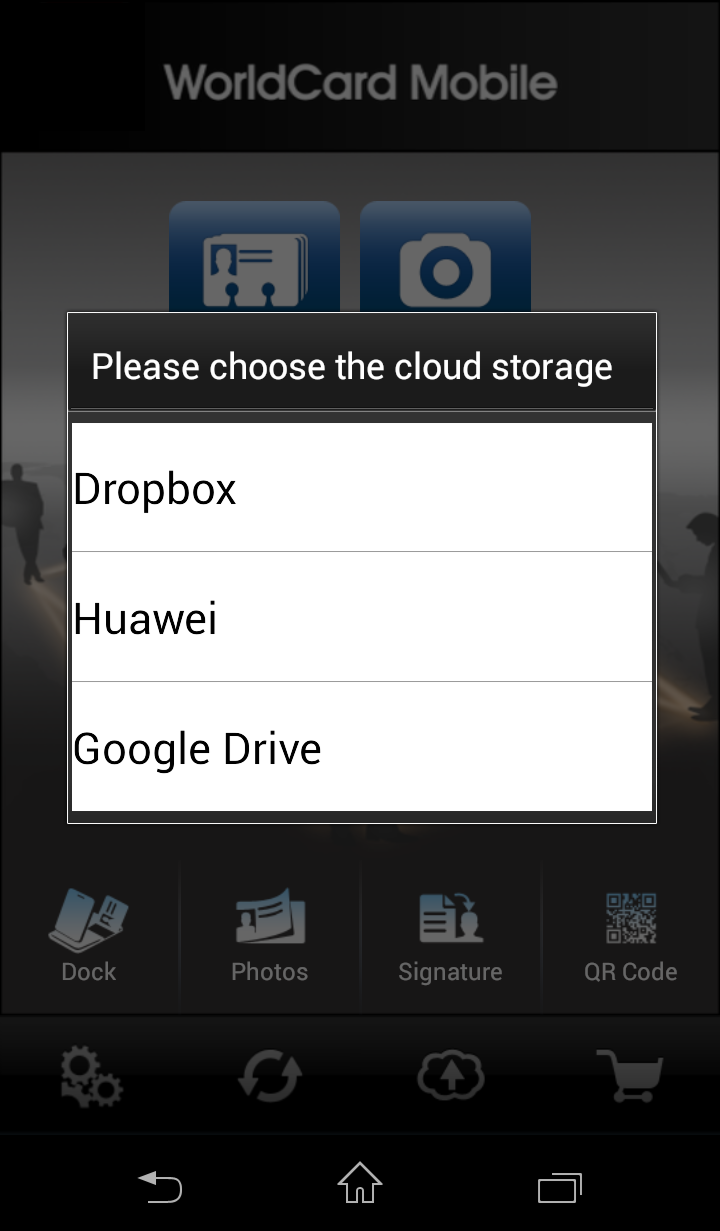
h. Import Dropbox/ Huawei file
1. Tap in the card
holder, and select [Import Cloud Storage(.wcxf)].
2. Choose the cloud storage you want to import and sign in to your account.
3. Choose the file you want to import and tap [OK].
4.
After choosing whether you want to select target group and tap [Yes], you will
see the contact's information has been imported into Card Holder.
Tip: If you want to sign out of Dropbox or
Huawei's account, please go to [Settings]/ [Cloud Storage]. Choose the cloud
storage that you don't need to use and tap [Yes] to sign out of the cloud storage.
Return to Content
i.
Add contact via QR Code
1. Tap  at the main page, to launch the camera to scan.
2. The camera will auto focus the QR code and scan.
3.
Check contact information and tap [Done] to save.
Return to Content
Sync Gmail contacts
1. If you
tap  before you set up any
Gmail account, the account setting page will show, please enter your Gmail
account first.
before you set up any
Gmail account, the account setting page will show, please enter your Gmail
account first.
2. Tap
, WorldCard Mobile will
start to sync immediately.
3. If the [Auto Sync] is checked, WorldCard Mobile
will auto sync your Gmail contacts every five minutes. If you
saw  , it means there
is a problem of syncing, please check your internet and account setting are OK,
it will back to normal after the synchronization is complete.
, it means there
is a problem of syncing, please check your internet and account setting are OK,
it will back to normal after the synchronization is complete.
4. After syncing, there will be a default Gmail group appeared in
the group list, this group cannot be modified or deleted.
Return to Content
View and Use Contact Profile
a. Card Holder overview
b. Use contact profile
a. Card Holder overview
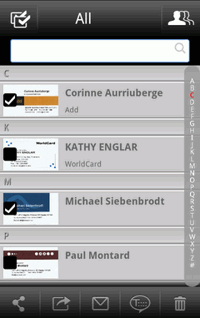
On the main screen, tap  . Your contacts appear in ordered rows containing information, such as the thumbnail of business card image, name, and company.
Note: The image information (card images and profile photos) is saved in SD. If the SD card does not exist, the image related field will be gray out.
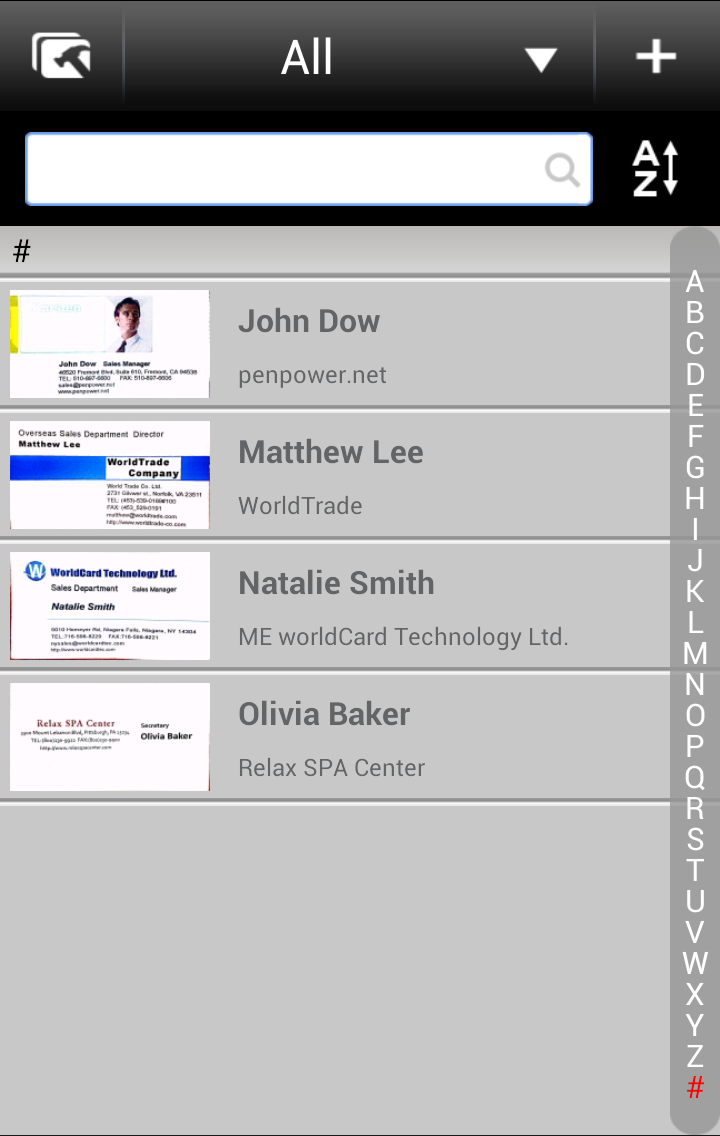
 Contact Management - Select multiple contacts to move to another group, send email to them, export them, share the contacts by email/message, or delete them.
 Display the current group's name. Tap
  to show the group list so that you can choose or edit.
Add contacts- Tap to select a way to add contacts.
 Sort button - Choose the
way to sort the contacts.
Sort button - Choose the
way to sort the contacts.
Index bar- Tap on any character to quickly find the contact you want to view.
Card Image- Tap on the thumbnail of the card image to edit card image.
Contacts- Tap on the contact field to use contact profile.
Tip: Long hold a contact to bring out the function menu to assign group, edit profile, export contact, share contact, delete contact, view the note field, or add a same company card.
- Add a card from the same company : Long hold a contact and tap Add a card from the same company to quickly add a new contact who works in the same company with the contact. There is no need to type the company information again and the new data will be saved in the same group with the contact as well.
b. Use contact profile
Tap the contact you want to browse.
Tip: The unverified contact info cannot be browsed until confirmed or edited.
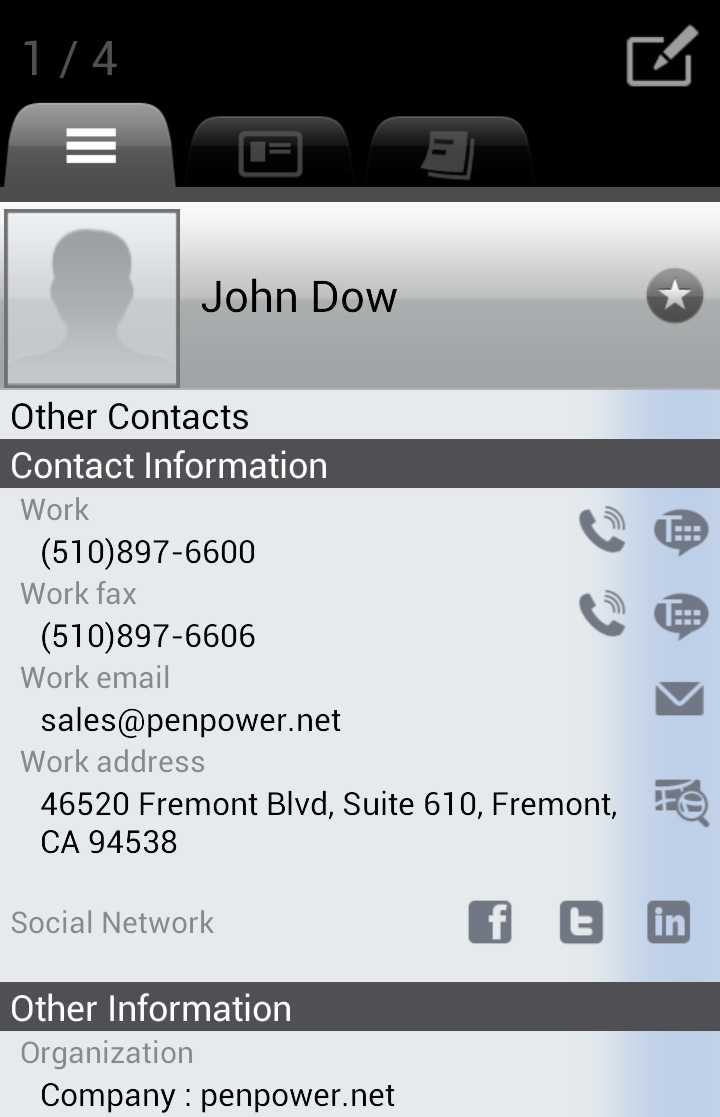
1. There are
three tabs on the top, [Contact information], [Card image], [Note], the
 button provides
[Edit], [Image Process], [Export], [Share], [Delete] functions.
button provides
[Edit], [Image Process], [Export], [Share], [Delete] functions.
2. Phone calls: tap  to call the contact person.
3. SMS: tap  to text message to the contact person.
4. Email: tap  to send an email message to the contact person.
5. Website: tap  to visit the website.
6. Maps: tap  and choose the electronic
map (Google Map/ Baidu Map) that you want to use for viewing the location of
contacts’ address.
and choose the electronic
map (Google Map/ Baidu Map) that you want to use for viewing the location of
contacts’ address.
Notes:
-
You have to download the
app of Baidu Map and Google Map to your phone before using [Maps] function.
-
It will be more limited to
view address on Baidu Map than on Google Map, except for the address in China.
7. Share: Press the menu button on the phone and tap [Share] to share contacts via email or sms
8. Find the contact quickly in Facebook, Twitter, or LinkedIn: Press the menu button on the phone. Choose [Facebook], [Twitter], or [LinkedIn] to make a quick search of the contact.
9. Delete contact: Press
button on the phone, and choose [Delete] to delete the contact.
Tip:
Slide to left or right to switch viewing contacts.
Return to Content
Edit Contacts
If you want to edit the contact profile, please tap
and choose [Edit] at the contact profile to edit the contact's profile.
After you have edited the contact, don't forget to tap [Done] to save the modification.
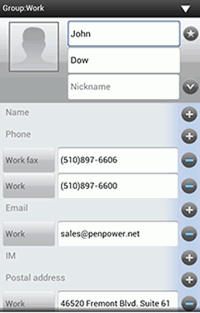
1. Modify the content: Tap a field to edit the content.
2. Change group: Tap the Group field on the top and you can assign the contact to another group, or add a new group for this contact.
3. Fold or unfolding the fields: The [Name] field can be unfolded to display detailed information or folded to only display main information. Tap  and you can unfold these fields to show all information. Tap
  and you can fold the fields to only show the main information.
4. Add a new field: Tap the Add  icon to add a new field, such as a new phone number field.
5. Delete a field: Tap  to delete a field.
6. Edit the label of a field: Some fields have default labels. To change the labels, please
1) Tap on the label of the field that you want to change. For example, tap Work of the Email field.
2) Select a new label name in the pop-up menu to replace the original. For example, choose Home to replace Work.
7. Add to Favorites: Tap the star button near the name field to add the contact to Favorites. When the button is  , the contact is listed in Favorites. When it is
  , the contact is not listed in Favorites.
8. Add or change profile photo: Tap on the profile photo  and choose [Camera] to take a picture, [Business Card] to crop the profile photo
from the business card, or [Choose Existing Photo] to select an existing photo
from Gallery.
After adding photo, press the side of square to enlarge or narrow the size, and
press inside the square to move to select the range of photo to cut. Also tap
to rotate the photo. Please
remember to tap [Done] to save the profile. You can tap [Delete] to delete the
existing photo if there was any.
and choose [Camera] to take a picture, [Business Card] to crop the profile photo
from the business card, or [Choose Existing Photo] to select an existing photo
from Gallery.
After adding photo, press the side of square to enlarge or narrow the size, and
press inside the square to move to select the range of photo to cut. Also tap
to rotate the photo. Please
remember to tap [Done] to save the profile. You can tap [Delete] to delete the
existing photo if there was any.
9. Partial recognition: You can re-recognize the selected region of the business card by tapping the [Partial OCR] button in the bottom of the screen. Then tap the inside of the frame to move it to select the region. Tap on the frame and you can adjust its size. After a region with text information is selected, please tap the [Recognize] and choose the field type.
10. Save the modification: After you have edited the contact, don't forget to tap [Done] to save the modification.
Return to Content
Edit card image
Tap
 to see the card image while viewing the contact.
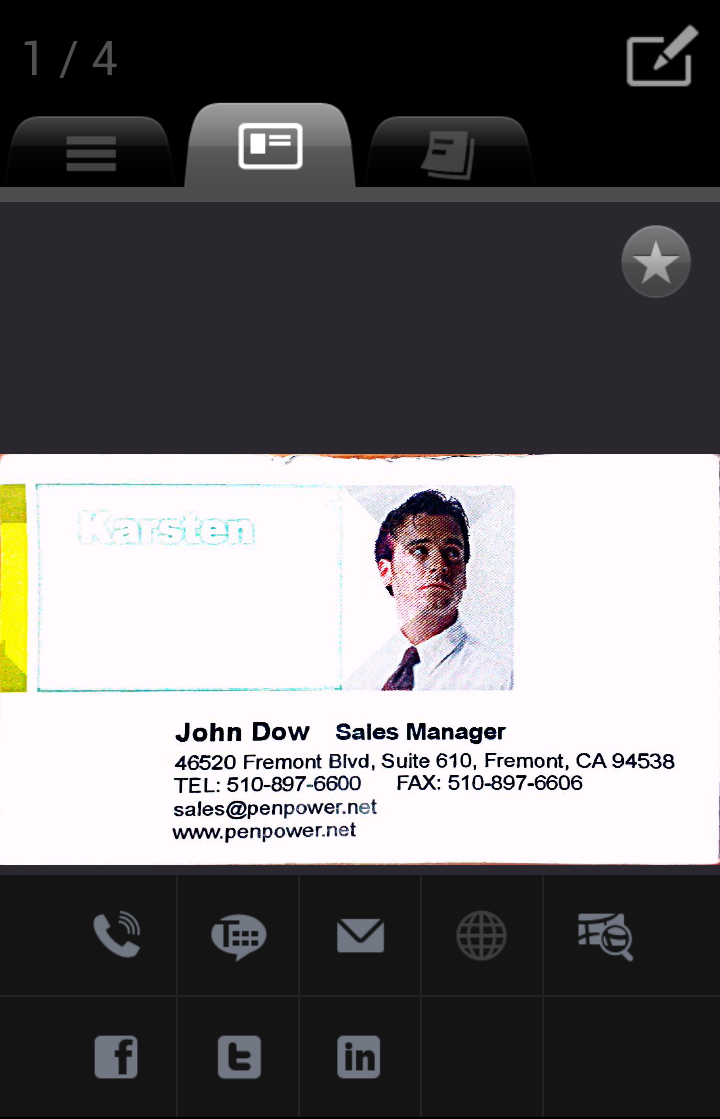
Tap
button and
choose
[Image Process] to enter the card image editing screen.
a. Add, change, or recognize the card image
b. Lighten or twist the card image
a. Add, change, or recognize the card image
Add a card image
You can add the back side of the card by
- Tap .
- Select [Camera] or [Choose Existiong Photo] to add the back side of the card image.
Change the image of the card
If an image exists, you can replace it with another by
- Tap [Replace].
- Select [Camera] or [Choose Existiong Photo] to assign a new image to replace the current one.
Recognize
- Tap [Recognize].
- Select a recognition language to recognize the information on the card.
Note: Only the information on the front side of the card can be recognized.
- Tap [Done] to save the modification.
Tips:
- If the business card is two-sided, you can tap
 to switch to the front or the back side of the card image.
- Tap or to rotate the image to proper orientation.
- The re-recognition action will delete the previous recognized information.
b. Lighten or twist the card image
Tap .
lighten
- Tap [Lighten] to lighten the image.
- Tap [Done] to save the modification.
twist
- Tap [Twist] to crop the card image as you like.
- Tap and hold the corner of the card image to crop the image as you desire.
- Tap [Done] to save the change.
Return to Content
Contact Management
1. Please tap the Contact Management icon .
2. Select the contacts you want to export.
Tip: Tap  to select all contacts in the targeted group at one time.
3. Then choose one of the following functions.
a. Move to another group
b. Share contact
c. Export contacts to the Contacts app or SD card
d. Export contacts to Dropbox/ Huawei cloud storage
e. Send Email
f. Send SMS
g. Delete Contacts
a. Move to another group
1. Tap  and choose the destination groups.
Tip: If there is no destination group to choose, you can tap [add] to add a new group.
2. Tap [Done] and the change takes effect right away after you select the target group.
Tip: While you are editing a contact profile, you can tap the [Group] field to select a group to sort the business card into a group.
b. Share contact
- Tap
 . Then select [SMS], [Email(vCard)], or [Email(wcxf)].
- The mail or message app will be launched. For email, the selected contacts will be converted to a .vcf or .wcxf file and attached to email right away. For SMS, the selected contact information will be shared in text format.
Note: The default for the email export is a maximum of 30 records at one time.
c. Export contacts to the Contacts app or SD card
- Tap
 .
.
- Select [Phone contacts] to export contacts directly to the Contacts app in your phone or select [.vcf(vCard)]/[.wcxf(WorldCard Exchange File)] to export contacts to the SD card.
Notes:
1). The proprietary *.wcxf (WorldCard Exchange File) format is used for exchanging contacts between WorldCard series. WorldCard series, released by Penpower Technology, are business card recognition and contact management products, running on different platforms, ranging from WorldCard (Windows), WorldCard Mac (Mac OS X) to WorldCard HD/WorldCard Mobile/WorldCard Contacts.
2). The exported path for .wcxf file is the “ SD card/worldcard_mobile/wcxf” path and “ SD card/worldcard_mobile/vCard” for .vCard format.
3). Some fields that are not supported in the Contacts app, such as Card Image, will not be exported.to the Contacts app.
d. Export contacts
to Dropbox/ Huawei Cloud Storage
- Tap the
 button at the lower right side of the Overview screen.
- Choose Dropbox or Huawei as the cloud storage to export the file and sign
in to your account.
- Select the file from the file list and tap [Done] to export it.
- When the
icon [Export finished] appears below the screen, you can find the exported file
in your cloud storage.
Tip: If you want to sign out of Dropbox or
Huawei's account, please go to [Settings]/ [Cloud Storage]. Choose the cloud
storage that you don't need to use and tap [Yes] to sign out of the cloud storage.
e. Send email
- Tap
 .
.
- Then you can start to write mail to the selected contacts.
f. Send SMS
- Tap
 .
.
- Then you can start to write messages to the selected contacts.
g. Delete contacts
1. Tap
 .
.
2. Tap [Yes] and the selected contacts will be deleted right away.
Return to Content
Group Management
Tap on the group name or tap next to the group name on the main screen to
a. View contacts in another group
b. Add a new group
c. Delete a group
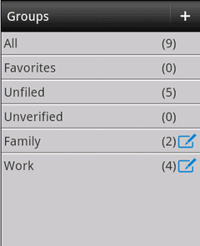
a. View contacts in another group
1. Tap on the group name.
2. Select a group in the group list to view and access the contacts in this group.
b. Add a new group
1. Tap  .
.
2. Enter a new group name.
3. Then tap [Done] to save the change.
c. Delete a group
1. Tap  .
.
2. Tap [Delete] to delete the group.
Note: Group "All", "Unfiled", "Unverified", and "Favorites" are preset groups that cannot be deleted.
Return to Content
Find Contacts
To find a contact quickly, you can simply jump to a group, use the searching function, or use the index to jump to a letter.
Group contacts
If you know the contact that you are searching for is in a group, you can simply jump to that group to get the contact. Please refer to enter into another group.
- Search
contacts by keywords
1. Tap on the search field.
2. Type keywords in the search field.
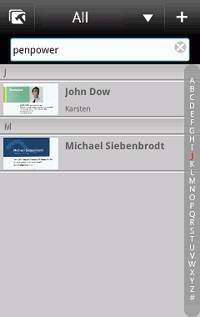
Note: The fields of name, company, email are searched.
3.The search results are shown as you type.
- Jump
to a letter in the index
Rather than scroll through the entire contact list, you can use the index to quickly jump to a letter.
1. Tap the desired letter in the index bar.
2. Jump to that letter in your contact list.
Return to Content
Settings
Tap to customize your own preferences.
Sync
Layout
Save/Export
General
Backup/Restore
Other
Activation Code
Sync
Please assign your account for sync
You can add / switch the Gmail
account to sync, and decide to let WorldCard Mobile sync with that account
automatically or not.
Layout
Dock button
setting
Check the option, the dock button will be
shown next to the card holder button.
If you uncheck the option, the dock button will remain in the default position.
Dock Mode
You can check the
option to use automatic capture function; or uncheck it to capture cards' images
manually while using Dock Mode.
Save / Export
a. Save to Phone Contacts
Check the option of [Save to Phone Contacts], and you can also save this contact to the phone's [Contacts] app, your Google or Exchange account at the same time when you add contacts into WorldCard Mobile.
b. Accounts/ Groups
Tap this item to select the exporting destination.
Note: You need to check the option of [Save to Phone Contacts] first.
c. Recognize Chinese As
When a Chinese business card is recognized by WorldCard Mobile, you can select to save the contact information in Simplified Chinese, Traditional Chinese, or as same as the card information.
General
Sort Order
Index Order
Western Name Order
Eastern Name Order
More PenPower App
Sort Order
Set display sequence contacts by
1. Name: Set the indexing criteria as Contact Name.
2. Company Name: Set the indexing criteria as Company Name.
3. Date: New -> Old: Sort contacts with creation date (newer first).
4. Date: Old -> New: Sort contacts with creation date (previous first).
Index Order
Set the index display sequence as Pinyin, Zhuyin, or Stroke.
Western Name Order
Set Western Name display sequence of the first name and last name.
Eastern Name Order
Set Eastern Name display sequence of the first name and last name.
More PenPower App
Tap to see more apps provided by PenPower.
Backup/Restore
WorldCard Mobile's back up and restore functions allow users to retrieve contacts.
Backup Path
Backup Image?
Backup
Restore
Backup Path
You can select to backup data to the SD card in your phone, or to an external SD card. The backup path should be valid when you restore the backup data.
Backup Image?
If you want to back up contacts to another SD card, please check this option to backup the card images at the same time. If you back up contacts in the same SD card, you can uncheck the option.
Backup
Tap to back up the contacts in Card Holder.
Note:
The contact information will be removed if you unistall WorldCard Mobile software. Please make sure to backup before uninstallation process.
Restore
If you have backed up the contacts in Card Holder, you can restore them.
1. Tap [Restore].
2. Select a backup file from the list to restore and tap [Yes] to start restoring.
Note:
1. Please note that the contact database in WorldCard Mobile will be replaced with the backup file.
2. The card images of WorldCard Mobile Paid version and Free version are both saved in the same SD card. Therefore, please note that when you restore data in WorldCard Mobile Paid version, the card images in WorldCard Free version may be removed as well.
Other
Find Duplicate Contacts
Tap to list the duplicate contacts. Select the data you want to delete, or you can tap on [Auto] and the system will select all the duplicate data automatically. Tap on [Delete] to delete the selected data.
Save Path
WorldCard Mobile allows you to
change the default save path to your second SD card.
Add Country Code after Recognation
WorldCard
Mobile will add the country code at the front of contact's phone number which is
based on the recognition result of country.
Activation Code
To use the official version of WorldCard Mobile, you have to provide your Gmail
or e-mail and the activation code.
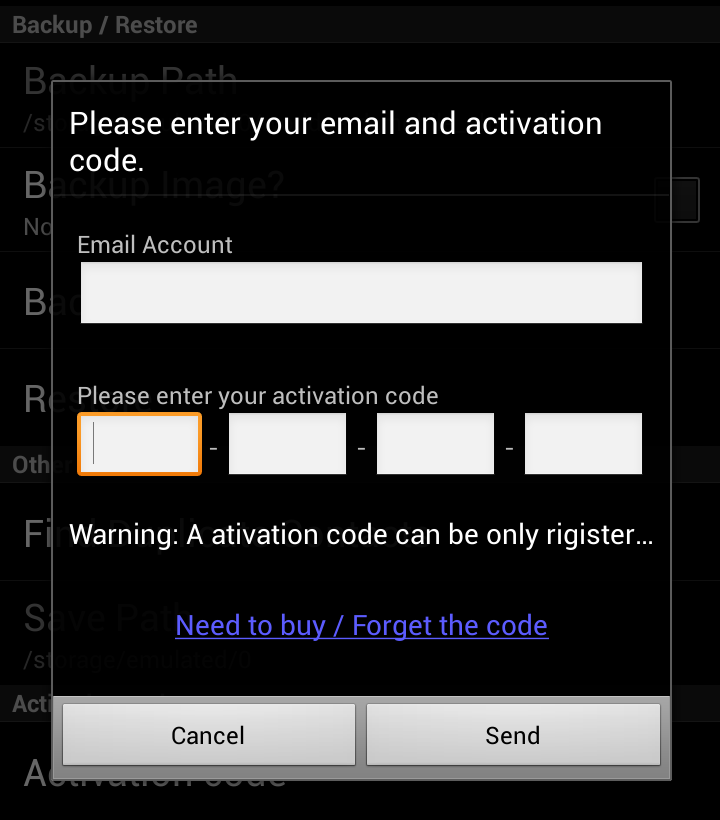
1.
WorldCard
Mobile will use your Gmail as first priority for the registration. If you don’t
have Gmail, you can also use other e-mail to upgrade your WorldCard Mobile app
to official version.
Note:
The e-mail you use will be the medium to retrieve the
activation code in the future.
2. After typing 16 numbers of the activation number, tap
[Send] to start the activation. When the [Lite] icon disappear from the Overview
screen, this means you can use the official version of WorldCard Mobile from
now on.
Return to Content
2014/05/15