WorldCard HD Help
Overview
Add Contacts
View and Use Contact Profile
Edit Contacts
Export Contacts
Group Management
Find Contacts
Favorites
Maps and Directions
Settings
Overview
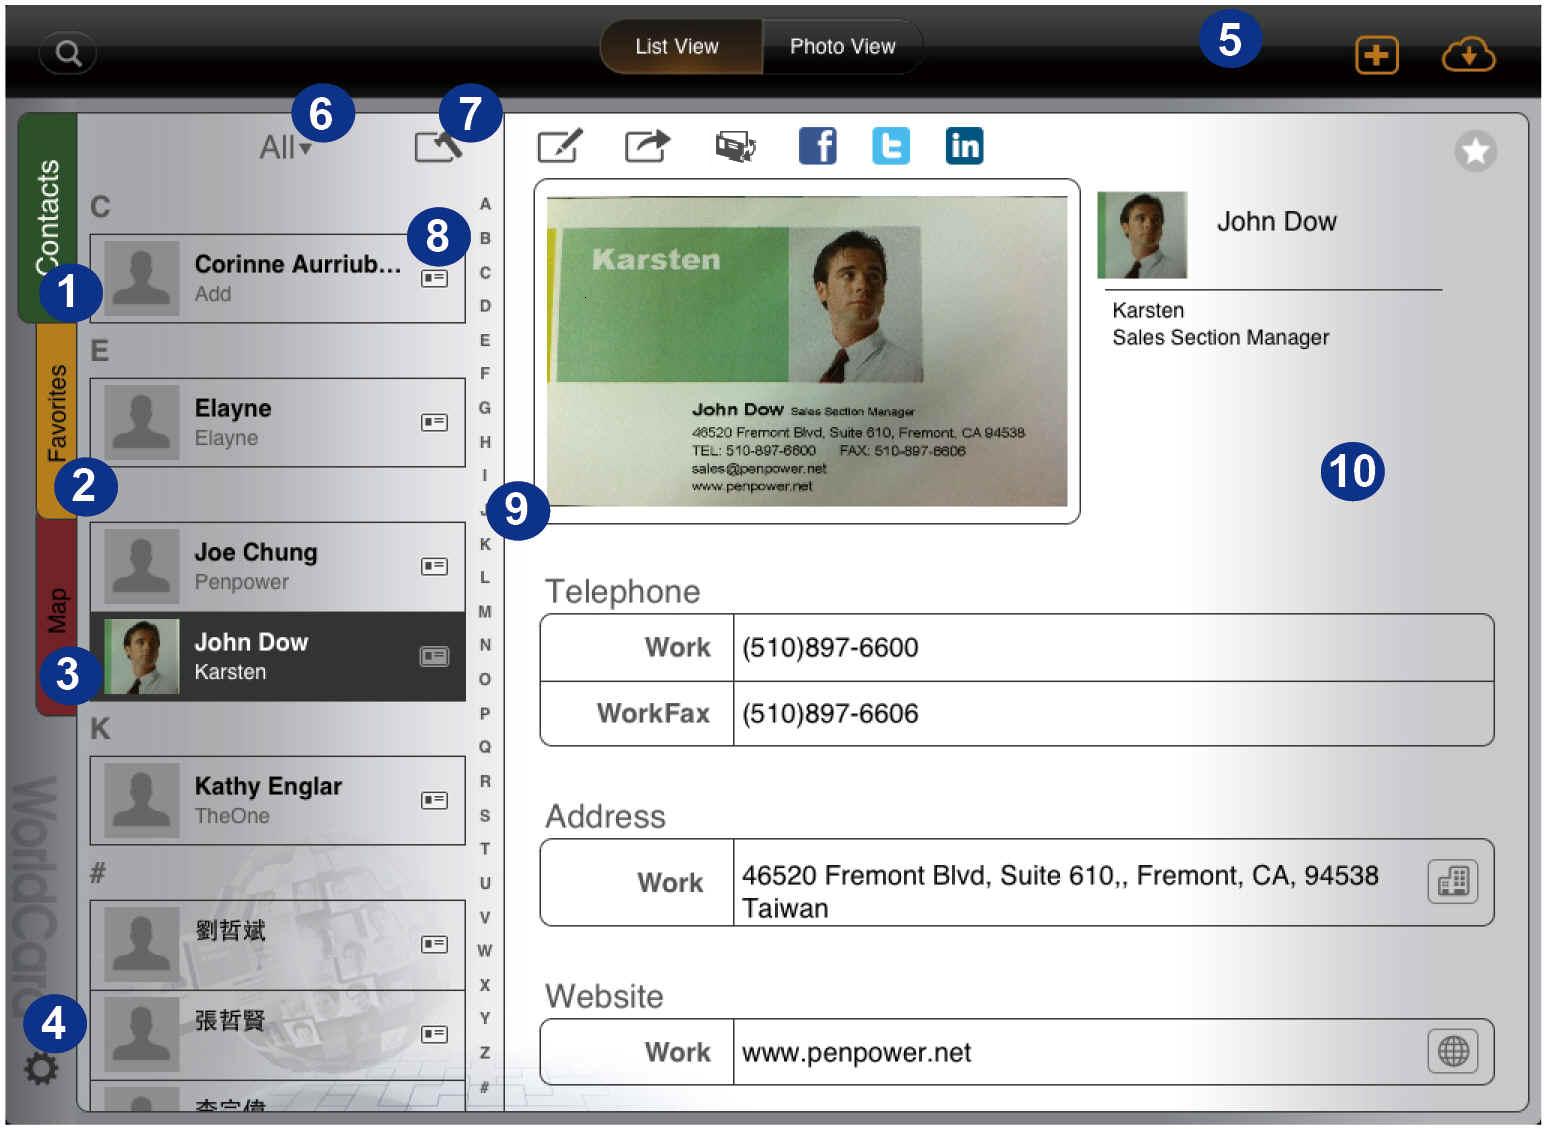
- 1. Contacts tab
- 2. Favorites tab
- 3. Map tab
- 4. Settings
- 5. Toolbar
- 6. Group
- 7. Contact management
- 8. Contact list
- 9. Index
- 10. Contact Profile
Tips:
1. WorldCard HD supports either landscape orientation or portrait orientation.
2. Press and hold a button for 2 seconds to bring up the icon name.
Return to Content
Add Contacts
Choose one of the following methods to add contacts into WorldCard HD.
a. create contacts from camera
b. create contacts from albums
c. import from iTunes File Sharing
d. import from iPad Contacts
e. create a contact manually
f. import from the cloud
g. gmail contacts sync
a. create contacts from camera
1. Tap  and select [Create Contact from Camera].
Note: Only iPad 2 above or iPad with camera supports the camera feature, and New iPad/ iPad mini is recommended.
2. Tap the camera button on your iPad 2 to focus and take a picture of the business card.
3.In the preview frame, you can:
- Tap
 or
or  to rotate the image.
- Select a proper recognition language in the lower-left corner of the screen. This version supports Traditional/ Simplified Chinese, Japanese, Korean, Czech, Danish, Dutch, English, Finnish, French, German, Greek, Hungarian, Italian, Norwegian, Polish, Portuguese, Portuguese (Brazil), Russian, Slovak, Spanish, Spanish (Mexican), Swedish, Turkish.
4. If you are not satisfied with the image quality, you can tap  to retake the card image.
5. If you want to recognize the back side of the business card, just tap  icon to capture the back side image and the contact information on it will be recognized also. If you want to recognize more images, just tap
  icon to recognize next business card.
6. Tap [Done] to start recognizing this card image and edit it when necessary.
Tip:The contact with a  icon means the contact is unverified. You can also find the unverified contacts in the [unverified] group.
b. create contacts from albums
1. Tap and select [Create Contact from Album].
2. Choose business card images from albums.
3. Tap [Import Photo].
4. Choose a recognition language.
5. The contacts will be recognized and added into the current group.
Tip: WorldCard HD supports English, French, German, Italian, Spanish, Portuguese, Dutch, Traditional Chinese, Simplified Chinese, Japanese, and Korean.
c. import from iTunes File Sharing
You can receive the contact files from iTunes File Sharing.
1. Tap .
2. Choose [Import from iTunes File Sharing] and select a contact file.
3. Then, tap [Import] to start importing.
Note: You need to copy a WorldCard Exchange File(*.wcxf) from your computer to WorldCard HD via iTunes File Sharing first before tapping this [Import] button to start importing contact data.
 How does [WorldCard] or [WorldCard Mac] export a .wcxf file to WorldCard HD via iTunes File Sharing?
([WorldCard] or [WorldCard Mac] is retail product from the developer, sold separately.)
- Run [WorldCard] or [WorldCard Mac] and select the contacts that you want to export.
- Select [Export] / [WorldCard Exchange File].
- Follow the export instructions to export this .wcxf file.
- Plug your iPad to your computer, launch [iTunes], and select your iPad from the [Device] section of iTunes.
- Go to the [Apps] tab and scroll down. You will see the [File Sharing] section.
- On the left side of the screen, please choose [WorldCard HD] from the list of supported applications.
- The right side of the screen allows you to copy files from your computer to WorldCard HD. Click [Add…] and follow the instructions to add the .wcxf file in your computer to your iPad.
d. import from iPad contacts
1. Tap .
2. Tap [Import from iPad Contacts] to add the contacts in the Contacts app into WorldCard HD.
Note: Some fields in the Contacts app are not supported in WorldCard HD and thus won’t be imported.
e. create a contact manually
1. Tap .
2. Tap [Create New Contact] and enter contact information in corresponding fields.
3. Tap [Done] to save the new contact into the current group.
f. import from cloud
Tap  and select a cloud service as the import source: iCloud or Dropbox.

Notes:
1. Please create an account if you do not currently have one. For iCloud, please go to the [Settings\iCloud] page on your iPad screen. To add your Dropbox account to the list, please go to Settings. If you don't have a Dropbox account, please create one first.
2. WorldCard contact files are saved in the [WorldCard\DataExchange] folder by default.
iCloud
- Select iCloud as the import source.
- Select a .wcxf file from the import file list.
Tip: You can select more than one .wcxf file at one time.
- Scroll down to the bottom and tap [Import] to start the import process.
- Tap [Yes] to continue importing the contacts.
- Tap [OK] to exit the import window.
Dropbox
- Select Dropbox as the import source.
- Login your Dropbox account and tap [Done].
- Select a .wcxf file from the import file list.
Tip: You can select more than one .wcxf file at one time.
- Scroll down to the bottom and tap [Import] to start the import process.
- Tap [Yes] to continue importing the contacts.
- Tap [OK] to exit the import window.
g. gmail contacts sync
WorldCard HD provides two contact's sources, Local Contacts and Cloud Contacts, to manage the contacts information. Cloud Contacts can be used for synchronizing with the Gmail Contacts. Set the current contacts as Cloud Contacts and you can start to synchronize.
- Tap [Group]
 or tap settings
  and select [Display]/[Current contacts]to set the current contacts as [Cloud Contacts].
Tips:
Before synchronization, please go to [settings]/ [Sync]/[Account] in app to setup your Gmail account information.
- Tap
 icon to synchronize Gmail Contacts.
- You will see how many contacts will be changed between local side and remote side after synchronization.
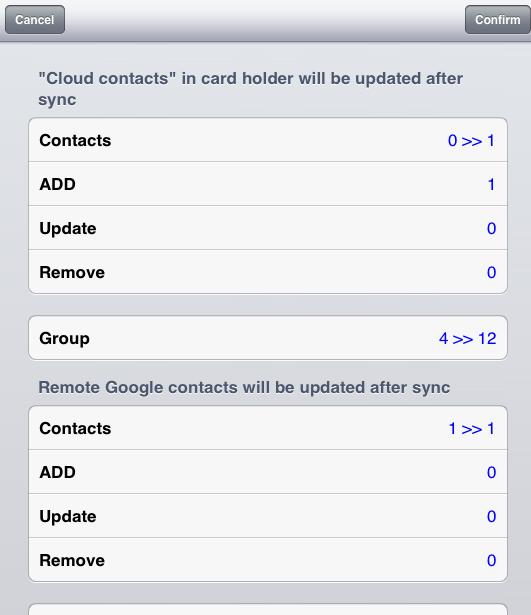
- Tap [Confirm] to finish the synchronization.
Return to Content
View and Use Contact Profile
a. the list view mode
b. the photo view mode
c. use contact profile
Tips:
1. You can use the index or search function to quickly find a contact. Contacts are sorted by contact name field by default. You can set the sorting order in Settings.
2. To enter into another group, please tap on the group name and select a group from the group list.
the list view mode
In the List View mode  , your contacts appear in ordered rows containing information, such as the thumbnail of profile photo, name, and company.
To view the contact profile in the List View mode, please
, your contacts appear in ordered rows containing information, such as the thumbnail of profile photo, name, and company.
To view the contact profile in the List View mode, please

1. Select a contact from the contact list.
2. The contact profile will be displayed on screen.
Tip: In the portrait List View mode, please tap  on the toolbar to display the contact list.
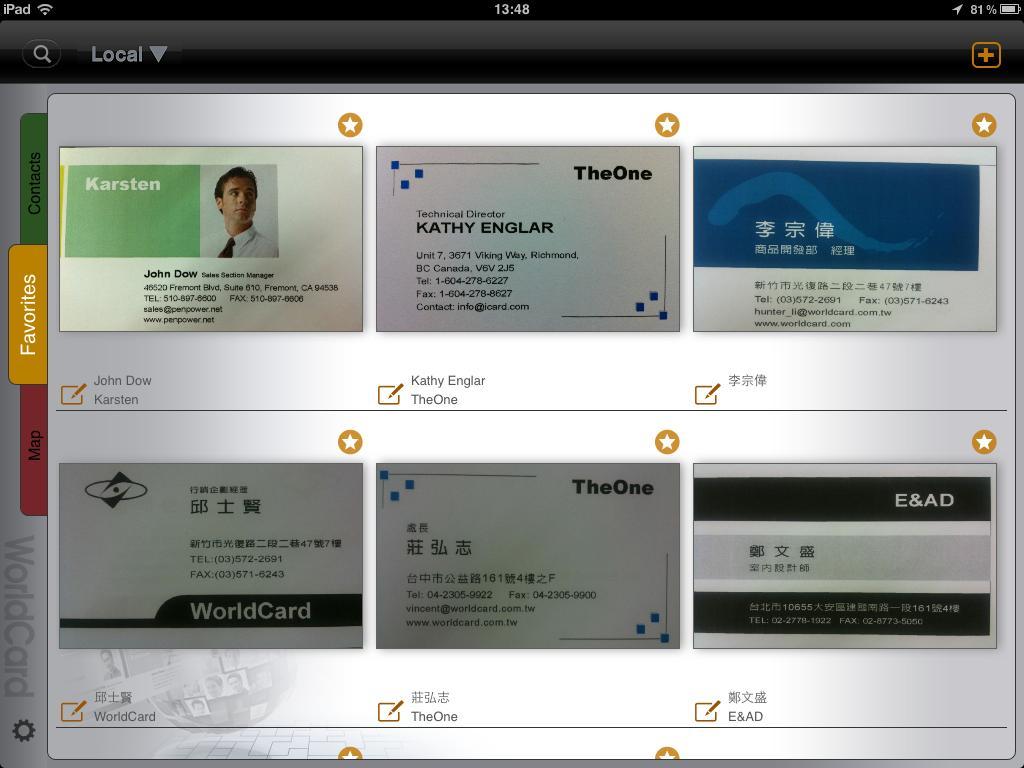
the photo view mode
The Photo View mode  displays contacts by listing the card images for easy identification. To view contact profile in the Photo View mode, please
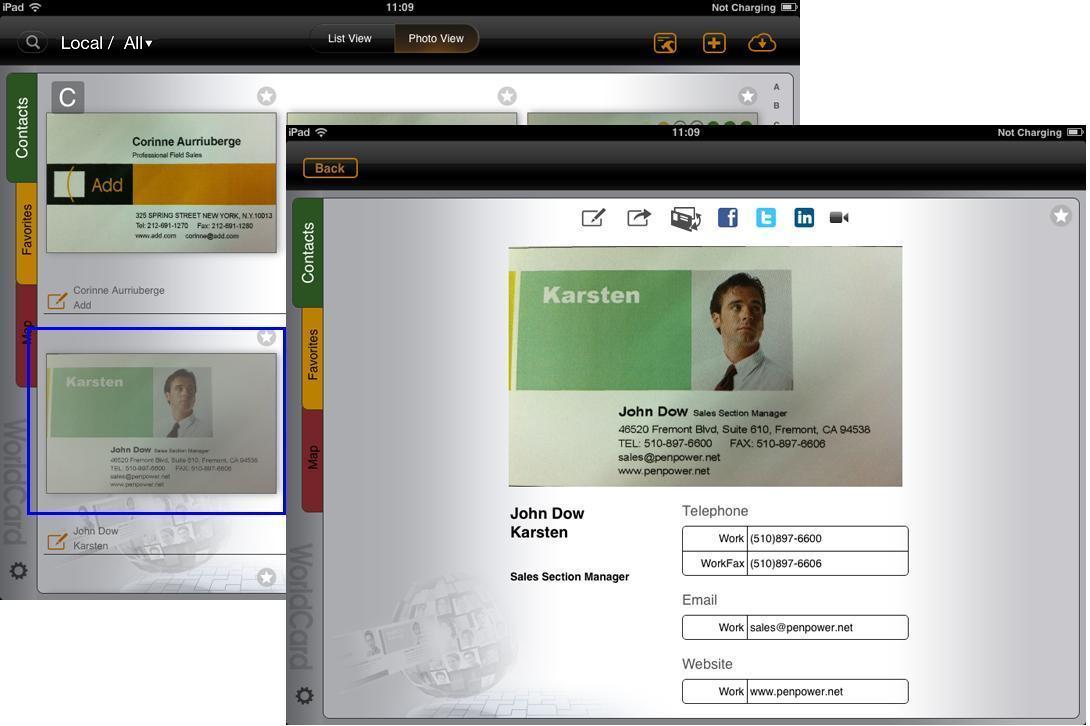
1. Select a card image.
2. The contact profile will be displayed on screen right away.
3. Flick through the card image to view the next or previous contact profile.
use contact profile
You can use contact information to:
share contact file by email
switch to front/back card image
find the contact quickly in Facebook, Twitter, or LinkedIn
make FaceTime video calls
email to the contact
visit the contact’s website
check the map of the contact
share contact file by email
While browsing the contact profile, tap  , and the contact information and the card image will be attached in an email message.
switch to front/back card image
While browsing the contact profile, tap  to switch to the front or back of the card image.
find the contact quickly in Facebook, Twitter, or LinkedIn
- Please tap
 ,
,  , or
, or  .
.
- Then you can make a quick search of the contact on Facebook, Twitter, or LinkedIn.
make FaceTime video calls
If you are using iPad 2, you can tap  to make video calls with this contact.
email to the contact
Tap the email address to send an email message to the contact person.
visit the contact’s website
Tap the URL address to visit the website.
check the map of the contact
While you are browsing the contact’s profile, tap the address field to link to Google Maps and show the location of the address on the map.
Return to Content
Edit Contacts
Select a contact and tap on the Edit icon  to
to
edit contact information
edit profile photos
edit card images
delete contacts
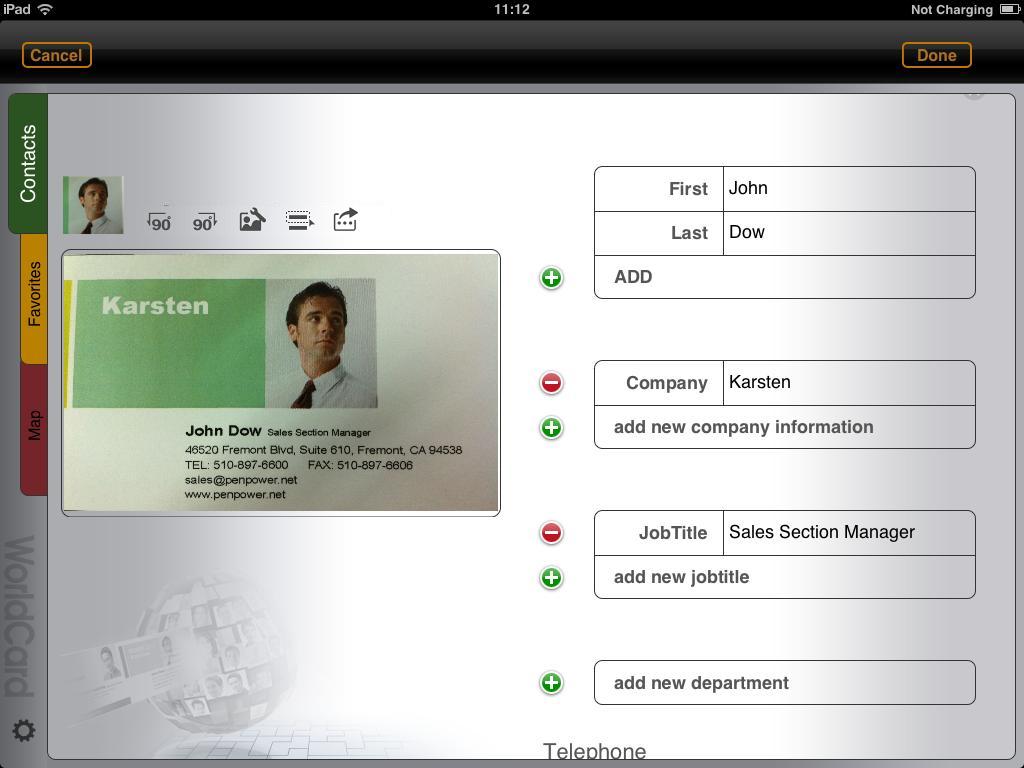
edit contact information
add or edit field below the current field
add or edit the label of a field
add a field
delete a field
add or edit field below the current field
- Tap
 and enter information to add another field below the current field.
- Tap [Done] to save the modification.
add or edit the label of a field
Every field has a default label. To change the label, please:
- Tap on the label of the field that you want to change. For example, tap Work of the Email field.
- Select a new label name in the pop-up menu to replace the original. For example, choose Home to replace Work.
- Tap [Done] to save the modification.
add a new field
- Scroll down and tap [Add field].
- Select a field name, such as a Date field. Then this new field will be attached to the contact profile.
- Enter content for this field.
- Tap [Done] to save the modification.
delete a field
- Tap
 to delete a field.
- Tap [Done] to save the modification.
edit profile photos
Tap on the profile photo  to:
to:
add a profile image
change the profile image
edit the profile image
delete the profile image
add a profile image
You could assign a photo to a contact for easy identification.
- Choose [Load photo from Album] to select an existing photo or [Capture photo from Camera] to take a picture.
- Tap [Done] to save the modification.
change the profile image
- Select [Change photo from Album] to select an existing photo or [Capture photo from Camera] to take a picture. .
- Tap [Done] to save the modification.
edit the profile image
- Select [Edit ID photo].
- You can move and resize the photo.
- Tap [Done] to save the modification.
delete the profile image
- Select [Delete Photo].
- Tap [Done] to save the modification.
edit card image
rotate, sharpen, or crop the card image
recognize partial content
add, change, or delete the card image
rotate, sharpen, or crop the card image
rotate
- Tap to rotate the image to proper orientation.
- Tap [Done] to save the change.
sharpen
- Tap
 , then
  to sharpen the image.
- Tap [Preview] to apply and check the result.
- Tap [Done] to save the change.
crop
- Tap , then
 to crop the card image as you like.
- Tap and hold the corner of the card image to crop the image as you desire.
- Tap [Preview] to apply and check the result.
- Tap [Done] to save the change.
recognize partial content
- Tap
 .
.
- Move the point on the upper-left or lower-right corner of the blue frame to select an area.
- You can also press on the information which has not been recognized or has been recognized incorrectly for 2 seconds, the blue frame will be automatically moved to this area.
- Tap the [Recognize] icon above the business card image.
- Scroll down or up to choose a field name and recognize the information into your desired field.
Tip:If the business card includes a photo, you can select the photo area and choose [Photo] field name to add the photo into the photo field.
recognize, add, change, or delete the card image
Tap  to re-recognize the card, add card image, change card image, or delete card image.
re-recognize the card
- Choose a side to re-recognize by tapping .
- Tap and select [Recognize].
- Select the recognition language to start recognizing.
- Tap [Done] to save the change.
add a card image
- Select [Add front/back side photo from Album] to select the card image from albums or [Capture front/back of card] to add the image from camera.
- Then the new card image will be added to this contact.
- Tap [Done] to save the modification.
change the image of the card
- Select [Replace front/back side photo from album] to select another card image from albums or [Replace front/back of card] to take another image from camera.
Tip: Tap to switch to the front or the back side of the card image.
- The new card image will replace the old card image.
- Tap [Done] to save the modification.
delete the image of the card
- Select [Delete front/back side photo] to delete the card image.
Tip: Tap to switch to the front or the back side of the card image.
- Tap [Yes] to delete.
- Tap [Done] to save the modification.
Note: After you delete a card image, WorldCard HD will create a visual business card for this contact.
delete a contact
- Scroll down and tap [Delete contact] and [OK] to delete the contact.
- To delete multiple contacts at one time, please tap on the Contact Management icon
 or
or  and select the contacts you want to delete. Then tap
  to delete them.
Tip: Tap  to select all contacts in this group.
Return to Content
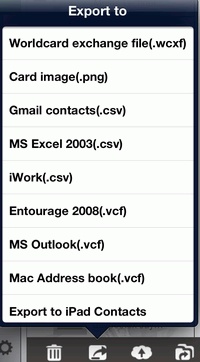
Export Contacts
1. Please tap the Contact Management icon .
2. Select the contacts you want to export.
3. Tap  .
.
4. Then choose one of the followings to export contacts.
Tip: Tap to select all contacts in the targeted group at one time.
a. Export Worldcard exchange file(.wcxf)
b. Export Card Image(.png)
c. Export CSV Files
d. Export VCF Files
e. email card photo
f. export to iPad Contacts
g. export to the Cloud
a. Export Worldcard exchange file(.wcxf)
Select [Worldcard exchange file(.wcxf)] and you can select the following three ways to export the selected contacts.
Note: The proprietary *.wcxf (WorldCard Exchange File) format is used for the interoperable interchange of contacts between WorldCard series. WorldCard series, released by Penpower Technology, are business card recognition and contact management products, running on different platforms, ranging from WorldCard (Windows),WorldCard Link(iPhone), WorldCard Mac (Mac OS X) to WorldCard HD/WorldCard Mobile/WorldCard Contacts (iPad/iPhone/iPod touch).
- Open In
Launch the app (WorldCard Mobile, for example) that supports the .wcxf format and import the selected contacts to it at the same time.
- Tap [Open In] and choose the app where you want the contacts to import in the pop-up menu.
- The selected app will be launched and the contacts in this .wcxf file will be imported right away.
- Export via email
Select [Export via email] and WorldCard HD will send the selected contacts as an email attachment in .wcxf format with a date in file name, such as WorldCard0626.wcxf.
Note: The default for [Export via email] is a maximum of 30 records at one time.
- Export to iTunes
Select [Export to iTunes] and the File Sharing feature allows you to easily transfer files between your iPad and computer. Simply convert your contacts to the .wcxf format and you can directly transfer the .wcxf file between your iPad and a computer.
Important: iTunes File Sharing requires: iTunes version 9.1 or later, Mac OS version 10.5.8 or later, and iOS version 4 or later.
How does [WorldCard] or [WorldCard Mac] import the .wcxf file shared via iTunes File Sharing?
- Plug your iPad to your computer, launch [iTunes], and select your iPad from the [Device] section of iTunes.
- Go to the [Apps] tab and scroll down. You will see the [File Sharing] section.
- On the left side of the screen, please choose [WorldCard HD] from the list of supported applications.
- The right side of the screen allows you to copy files from [WorldCard HD] to your computer. Select a .wcxf file and click [Save to…] to save the file to your computer.
- Run [WorldCard] or [WorldCard Mac].
- Select [Import] / [WorldCard Exchange File].
- Follow the import instructions to import this .wcxf file.
- Once the import process is completed, you can view the contacts in the .wcxf file in [WorldCard] or [WorldCard Mac] right away.
b. export card Image(.png)
Select [Export Card Image(.png)] and you can select [Export via email] to send the imges out via Email, select [Export to iTunes] to export the images to iTunes, or select [Save image to photos] to save the card images in iPad.
c. export CSV files
Convert your contacts to different types of CSV files, such as Gmail Contact (.csv), iWork(.csv), and MS Excel 2003 (CSV) via iTunes or Email.
- Select [Gmail Contact (.csv)], [iWork(.csv)], or [MS Excel 2003 (CSV)], and you can select [Export via email] to send the imges out via Email, or select [Export to iTunes] to export the images to iTunes.
Note: The Email export has size limitation. If the selected contacts are exceeding the size limitation, they will be separated into two or more Emails.
d. export VCF files
Convert your contacts to different types of VCF files, such as Entourage 2008 (.vcf), MS Outlook(.vcf), and Mac Address book(.vcf) via iTunes or Email.
- Select [Entourage 2008 (.vcf)], [MS Outlook(.vcf)], or [Mac Address book(.vcf)], and you can select [Export via email] to send the imges out via Email, or select [Export to iTunes] to export the images to iTunes.
Note:
1.The Email export has size limitation. If the selected contacts are exceeding the size limitation, they will be separated into two or more Emails.
2.While browsing the contact profile, tap , and the contact information and the card image will be attached in an email message.
e. export to iPad Contacts
Select [Export to iPad Contacts] to send the selected contacts to the Contacts app in iPad.
Note: Some fields that are not supported in the Contacts app, such as Card Image, will not be exported.
g. export to the Cloud
Tap  and choose iCloud or Dropbox as the export destination.
iCloud
- Tap on the iCloud option to start the export process.
- Then the selected contacts will start to export to your iCloud account.
Dropbox
- Tap on the Dropbox option.
- Login your Dropbox account and start the export process.
- Then the selected contacts will start to export to your Dropbox account.
Note:
First you should add a Dropbox account in the list. Please refer to Settings.
Return to Content
Group Management
Tap on the group name  on the main screen to
enter into another group
add a new group
delete a group
move contacts to another group
enter into another group
1. Tap on the group name.
2. Select a group in the group list to view and access the contacts in this group.
add a new group
1. Tap  .
.
2. Enter a new group name.
3. Then tap [Done] to save the change.
delete a group
1. Tap  .
.
2. Tap next to an item, then [Delete] to delete the group.
3. Tap [Done] to save the change.
Note: Group "All" and "Unfiled" are preset groups that cannot be deleted.
move contacts to another Group
1. Tap the Contact Management icon .
2. Select the contacts that you want to move.
3. Tap  and choose the destination group.
4. Tap [Yes] and the change takes effect right away after you select the target group.
Return to Content
Find Contacts
To find a contact quickly, you can simply jump to a group, use the searching function, or use the index to jump to a letter.
group contacts
If you know the contact that you are searching for is in a group, you can simply jump to that group to get the contact. Please refer to enter into another group.
-
search contacts by keywords
1. Tap  .
.
2. Type keywords in the search field.
Note: The fields of name, company, job title, department, address, telephone, and the like are searched.
3.The search results are shown as you type.
Note: By default, searching is done on the current group. Go to Group All to search all contacts.
jump to a letter in the index
Rather than scroll through the entire contact list, you can use the index to quickly jump to a letter.
1. Tap the desired letter in the index bar.
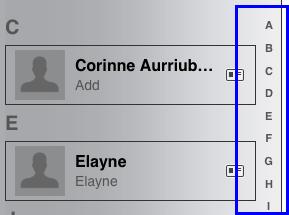
2. Jump to that letter in your contact list.
Return to Content
Favorites
WorldCard HD provides two contact sources, Local Contacts and Cloud Contacts, to help you to manage the contacts easily. Then, you can also save the contacts in “Favorites” page for these two contact sources individually. Tap  on the top-left of the screen to switch the favorite contacts for Local Contacts and Cloud Contacts.
add contacts to Favorites
view contacts in Favorites
remove contacts from Favorites
rearrange the sequence of contacts
add contacts to Favorites
To mark the contacts you use frequently as favorites, please
- Select a contact. Tap Favorites
 at the upper right corner of the screen. When this icon becomes
  , it means this contact is added into Favorites.
- In the Favorites tab, tap and select a contact to directly add it into the Favorites list.
view contacts in Favorites
- Tap the Favorites tab on the main screen.
- Choose one contact from Favorites to view the contact profile.
remove contacts from Favorites
- In the Favorites tab, choose a contact.
- To remove a contact from Favorites, please tap at the upper right corner of the screen to make the star icon turn to .
rearrange the sequence of contacts
You can rearrange the sequence of the contacts in the Favorites list.
- Tap a contact and hold your finger on the item for three seconds.
- Drag it and rearrange its sequence.
Return to Content
maps and directions
get a contact’s location and directions
get GPS info
Get a contact’s location and directions
- In the Map tab select a contact.
- This contact's location will be displayed on the map, along with other contacts near this one.
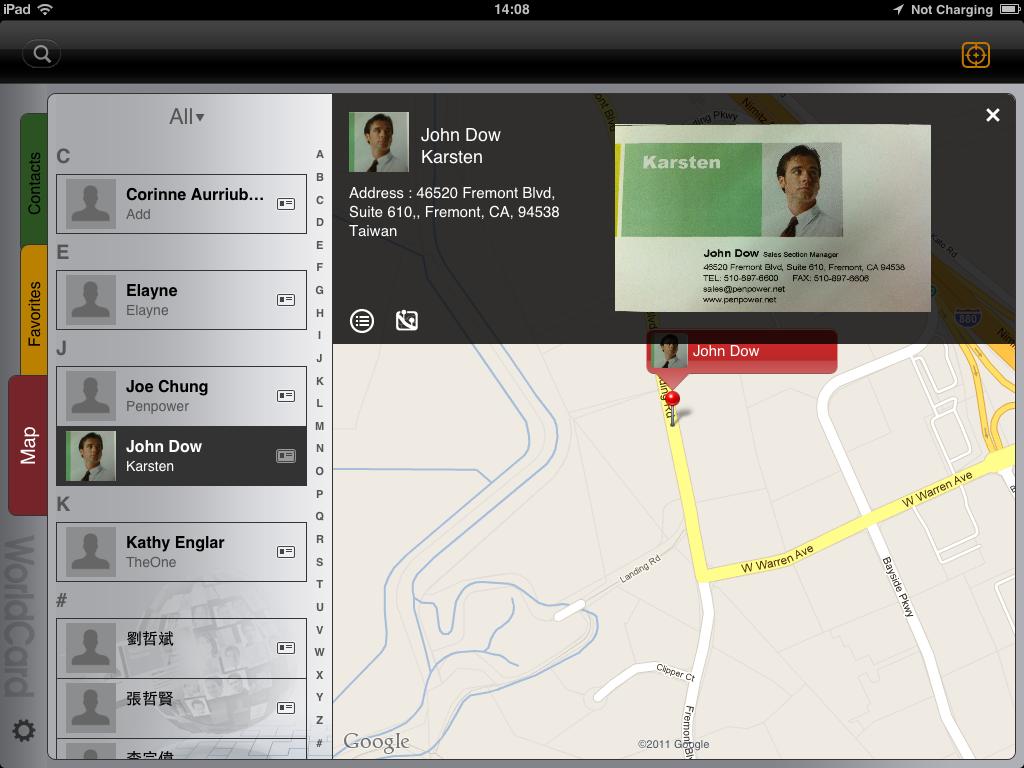
Tips:
1. Tap  at the upper right corner to find your current location.
2. While you are browsing the contact’s profile, tap the address field to link to Google Maps and show the location of the address on the map.
- Tap this contact on the map and you can browse the information about this contact.
Tip: If there is more than one contact having the same address, tap to select the contact you want to browse in the pop-up menu.
- Tap
 to view the profile in the Contacts tab.
- Tap
 to get directions between your current location and this contact’s.
- Tap
 to close this window.
Get GPS Info
- In the Contacts tab, select a contact and tap .
- Go to the Address field.
- Tap
 to get the GPS info.
Return to Content
Settings
Tap to customize your own preferences.
Display
General
Cloud
About
Display
Eastern Name Order: Set display sequence of the first name and last name.
Western Name Order: Set display sequence of the first name and last name.
Sorting by Field: Set the indexing criteria as Contact Name or Company Name.
Current Contacts: Select a group you want to manage now, Loacal Contacts or Cloud Contacts. If you select Cloud Contacts, you can synchronize the Gmail Contacts with WorldCard HD.
Chinese Display: When recognizing the Chinese language cards, you can select Traditional Chinese, Simplified Chinese, or Same as card info by this option.
General
Index Mode:
- English Alphabet: Set the index to follow the English Alphabet order.
- Chinese ZhuYin: Set the index to follow the Chinese Zhuyin order.
- Chinese HanPin: Set the index to follow the Chinese Pinyin order.
- Chinese Stroke: Set the index to follow the Chinese stroke order.
- Japanese Phonetic: Set the index to follow the Japanese Phonetic.
- Korean Phonetic: Set the index to follow the Korean Phonetic.
Find Duplicate Data:
- Tap this option.
- The duplicated contacts will be listed on screen.
- Tap on a contact to view the profile of this contact.
- Tap next to an item to delete this contact.
- Tap [Done] to save the modification.
Display Nearby Contacts: Switch it on to show the neaby contacts on map.
Enhance image settings: Switch it on to automatically enhance every image added in the Card Holder.
Cloud
iCloud
Dropbox
Backup and Restore
iCloud
If you haven't set up your iCloud account, please go to the [Settings\iCloud] page on your iPad screen to create it.
Dropbox
- Tap [Add account].
- Enter your dropbox account name.
- Tap [Done] to save this account into the dropbox account list.
Tips:
1. You can add more than one Dropbox account into the list.
2. WorldCard HD will save your login information including username and password.
Backup and Restore
Tap [Backup and Restore] and select a cloud service.
Backup
Restore
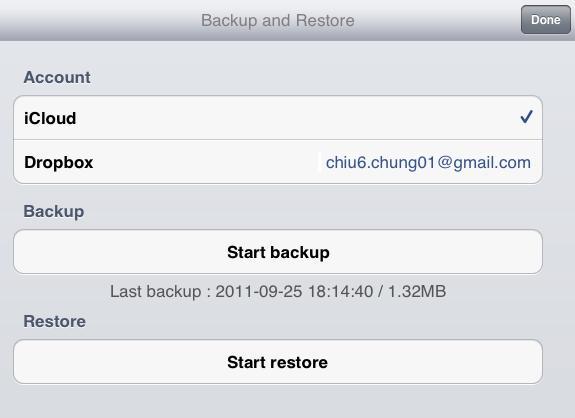
Backup
- To backup, tap [Back Up Now].
- After the backup process is completed, please tap [OK].
- You will see the backup file information listed on screen.
Restore
- Tap [Restore Now].
- Select a file to restore.
- After the restoring process is completed, please tap [OK].
Important: Please note that the contact database in WorldCard HD will be replaced with the backup file.
Sync
Account: Input email address and password of your Gmail account for synchronizing Gmail Contacts with WorldCard Mobile.
Sync conflict handle rules: If the contact information has been
changed in both remote side and local side to cause a conflict, you can select a rule to manage it.
- Keep latest modified data - Synchronize according to the latest modified data.
- Keep "Cloud Contacts" local side data - Synchronize according to the data in the local side.
- Keep "Cloud Contacts" remote side data - Synchronize according to the data in the remote side.
Reset sync relationship: If you reset sync relationship, next time your synchronization will be a new initial synchronization to merge the data in Cloud Contacts in Card Holder and Gmail Contacts.
About
Tap to see the information of WorldCard HD.
Return to Content
2013/02/07