WorldCard Enterprise for Android User Manual
WorldCard Enterprise provides personal platform for managing business cards. In [My Favorites] area, users can add and use contact information from business cards. Also, users can build their own category system for managing the contacts, and every information that added or edited in [My Favorites] will be uploaded to [Public Contacts]. Through the update mechanism, you can share your contacts information with other users and get theirs information immediately to update and enlarge your contacts database.
User Interface Introducing
Add Contact
Edit Contact
Information
Contacts Category Management
Use the Public Contacts
View and Use the Contact
Information
Settings
Offline Mode
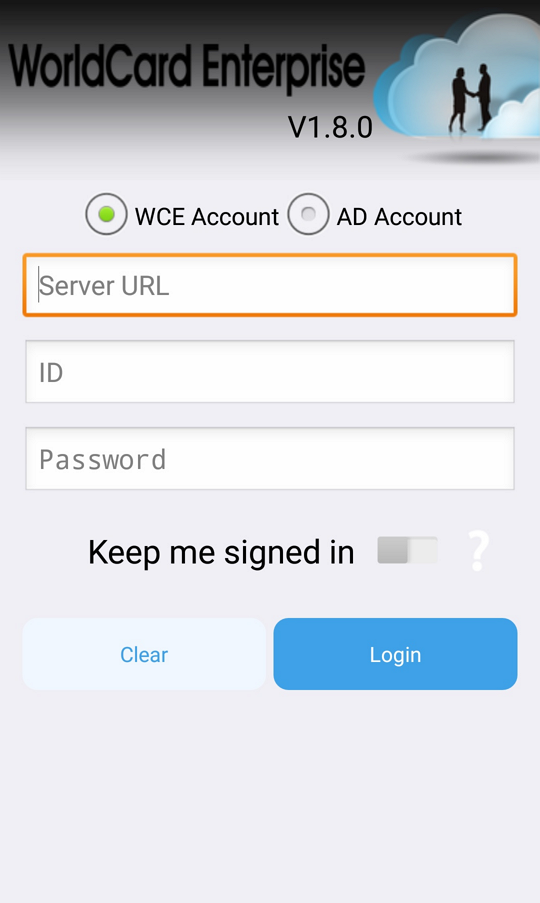
When you enter the login page of WorldCard Enterprise, please choose using [WCE Account] or [AD Account] to log in, and enter your account and password to log in to the server, if you enable the [Keep me signed in] option, it will auto log in every next time.
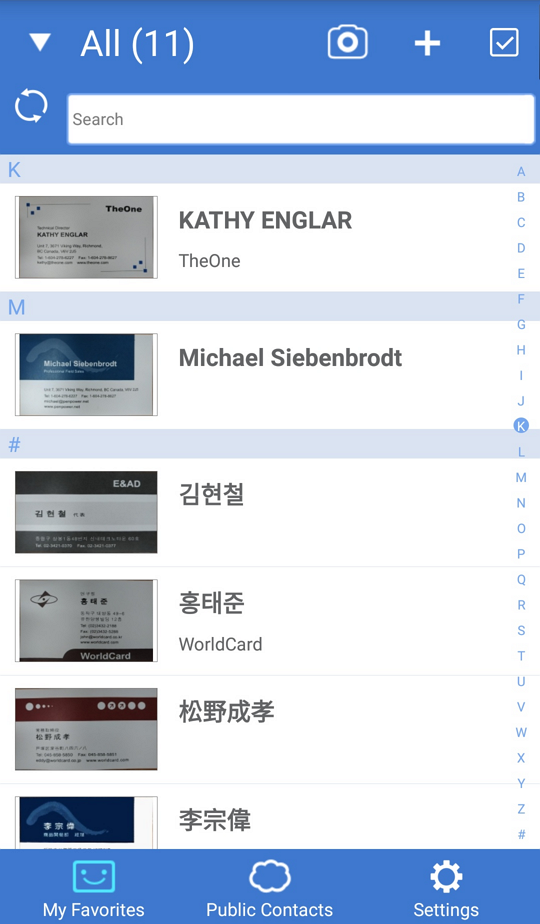
When you log in to WorldCard Enterprise app, you will enter the [My Favorites] area. All your personal contacts will be listed here.
WorldCard Enterprise app provides various ways to add contact:
Using
Camera to Shoot Business Card
Shooting Business Card via
Dock Mode
Scanning the Contact's QR Code
Import WorldCard Exchange
File(*.wcxf)
Manually Establish Contacts
Add Contacts From the Email
Signature
Add Contacts From Picture
Using Camera to Shoot Business Card
Click
![]() in [My Favorites] to open the camera, and
rotate your mobile phone to portrait or landscape according to the business
card, also make sure the business card is completely being in the shooting area.
in [My Favorites] to open the camera, and
rotate your mobile phone to portrait or landscape according to the business
card, also make sure the business card is completely being in the shooting area.
Tips:
Tap
![]() can use macro
function, tap
can use macro
function, tap
![]() is to enable the auto focus. Tips: Tap Image Process
is to enable the auto focus. Tips: Tap Image Process
![]() to twist and lighten the photo automatically;
to twist and lighten the photo automatically;
![]() will not process any image
enhancement;
will not process any image
enhancement; ![]() will only twist the image;
will only twist the image;
![]() will only lighten the image.
If your phone has flash
light,
tap the flash button
will only lighten the image.
If your phone has flash
light,
tap the flash button ![]() to turn the
flash on,
or tap
to turn the
flash on,
or tap ![]() set it as auto, or tap
set it as auto, or tap ![]() to disable the flash.
to disable the flash.
Choose correct recognition language, and tap [Done]
![]() to start
recognizing.
If you want to recognize the back side of the business card, just tap
to start
recognizing.
If you want to recognize the back side of the business card, just tap
![]() to capture the back side image.
Also,
If you want to capture more images, just tap
to capture the back side image.
Also,
If you want to capture more images, just tap
![]() to shoot another card.
The number in the upper
right corner of
to shoot another card.
The number in the upper
right corner of
![]() indicates how many business cards have been
taken.
indicates how many business cards have been
taken.
You can view and edit contact details after recognition.
Tap
![]() to save the contact to [My Favorites].
to save the contact to [My Favorites].
Tap
![]() and choose [Dock mode],
this mode needs to use with [WorldCard
Mobile Phone Kit] product.
and choose [Dock mode],
this mode needs to use with [WorldCard
Mobile Phone Kit] product.
Put your Android phone on the phone stand. WorldCard Enterprise APP will detect the QR Code pattern on the business card stand. Once the app sensed it, the system will ask you to put in the card. When you put a business card on the card stand, the app will capture it automatically.
You can tap
to
![]() swap
[Single Side Recognition Mode]
and [Double Side Recognition Mode];
If you choose [Double Side Recognition Mode], the
avatar in the middle of screen will
become
swap
[Single Side Recognition Mode]
and [Double Side Recognition Mode];
If you choose [Double Side Recognition Mode], the
avatar in the middle of screen will
become
![]() to
remind you to
capture the back side image.
to
remind you to
capture the back side image.
Tap [Done] icon to start recognizing the card images. If you want to continue to capture more cards, please remove the previous card off the card stand and put on another one to capture it.
After the recognition, the contact information will be saved to [My Favorites].
Tap
![]() and choose [QR
Code],
the camera will be opened.
and choose [QR
Code],
the camera will be opened.
Focus the camera to the QR code you want to scan, the app will auto scan and recognize the contact information.
Tap [Done] to save the contact to [My Favorites].
Import WorldCard Exchange File(*.wcxf)
Tap
![]() at the bottom right of the main
page to
enter the setting page, and choose
[Import WorldCard Exchange File (*.wcxf)].
at the bottom right of the main
page to
enter the setting page, and choose
[Import WorldCard Exchange File (*.wcxf)].
Select the file you want to import to start importing.
Tap
![]() and choose [Add a contact manually].
and choose [Add a contact manually].
Fill in the contact information in each field.
Tap
![]() to save the
contact to [My Favorites].
to save the
contact to [My Favorites].
Tips: If you want to add a new contact from the same company
information with the other contacts, please
hold-press the other contact's
information in the contact list and choose
[Add a card from the same company]. The system will open a new editing
page and enter the related company information automatically. After filling
other information fields, tap
![]() to
save the contact.
to
save the contact.
Add Contacts From the Email Signature
Open any document with email signature information (ex. Gmail).
Select and copy the text that you want to recognize in the email signature area.
Open WorldCard Enterprise app and
tap ![]() in [My Favorites]. Choose [eSignature]
in the list, your
copy of email signature information
will
be
automatically
pasted to the editorial area.
in [My Favorites]. Choose [eSignature]
in the list, your
copy of email signature information
will
be
automatically
pasted to the editorial area.
Tap
![]() icon. the system will recognize the texts you
copied and
then automatically save the contact information,
you
can view and edit contact details right away.
icon. the system will recognize the texts you
copied and
then automatically save the contact information,
you
can view and edit contact details right away.
Click
![]() to save the contact to [My Favorites].
to save the contact to [My Favorites].
Note: If the pasted signature was mess, please adjust the paragraphs before recognizing.
Tap
![]() and choose [Add a contact manually].
and choose [Add a contact manually].
Select an existing card image in a mobile phone and preview the image.
Note: The selected business card image has to be jpg format.
Tips: Click
![]() or
or
![]() rotate the
image. Click [Image Process]
to twist or
lighten the card
image.
rotate the
image. Click [Image Process]
to twist or
lighten the card
image.
Select the recognition language and click [Recognize] to identify the name card.
You can view and edit contact data when the recognition is complete.
Click
![]() to save the contact to [My Favorites].
to save the contact to [My Favorites].
Edit Text Information
After you add a new contact by shooting or your
contacts information has changed, you will need
to edit your contacts information; Please tap
the contact you are going to edit to enter the
detail information page, and tap ![]() icon on the up-right corner, and then choose
[Edit]] to enter editing page.
icon on the up-right corner, and then choose
[Edit]] to enter editing page.
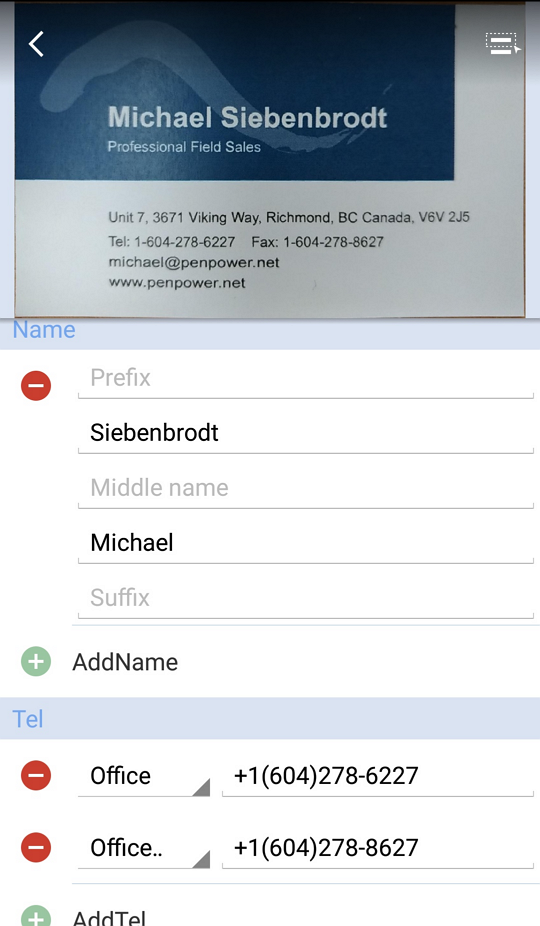
In the editing page, tap ![]() /
/
![]() to add/delete any field, also you can change the
field label, E.g. you can change the phone
number from [Home] to [Office].
to add/delete any field, also you can change the
field label, E.g. you can change the phone
number from [Home] to [Office].
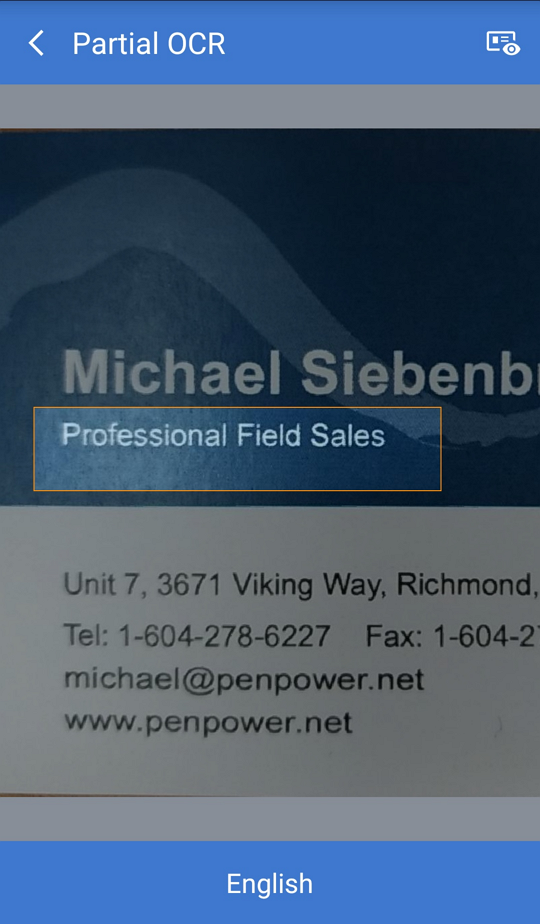
If there is a field information didn't be
recognized, you can tap
![]() on the up-right of the screen to open Partially
Select function, at this time
you can use two fingers to enlarge the picture,
and then move and scaling the orange frame on the
image to select the information you want to
recognize, after that, choose the recognize
language at the bottom, and tap
on the up-right of the screen to open Partially
Select function, at this time
you can use two fingers to enlarge the picture,
and then move and scaling the orange frame on the
image to select the information you want to
recognize, after that, choose the recognize
language at the bottom, and tap
![]() on the up-right corner, many kinds of fields
will be listed for you to choose what field does
the partially selected information belongs to,
and then WorldCard Enterprise app will recognize and
enter the information into the filed you decide
automatically.
on the up-right corner, many kinds of fields
will be listed for you to choose what field does
the partially selected information belongs to,
and then WorldCard Enterprise app will recognize and
enter the information into the filed you decide
automatically.
If you are willing to partial the information at
the back side of the card, just tap
![]() icon to change to back side card image.
icon to change to back side card image.
After editing, please remember to tap [Save] to save changes when you press back button.
Categorize Your Contacts
There is a [Category] item at the bottom of contact information page, tap it then you can modify this contact's category.
Edit Card Image
Tap a contact to enter information page, and tap the card image to enter card image viewing mode. Here you can rotate the image, refresh or add back side card image.
In the image process page,
you can tap
![]() to lighten the image to make the texts become
more recognizable, and move and scaling the
orange frame in the image to select the card, and
then tap
to lighten the image to make the texts become
more recognizable, and move and scaling the
orange frame in the image to select the card, and
then tap
![]() to cut off the extra parts outside the card
image, after that, tap
to cut off the extra parts outside the card
image, after that, tap ![]() to save the changes.
to save the changes.
If the contact has no card image, tap the avatar can add a card image for this contact.
By creating different kinds of category, you can categorize your contacts for better management. Tap the category name on the up-left corner of main screen to open the category list.
Add New Category
Tap
![]() next to the main category to open sub-category.
Tap
next to the main category to open sub-category.
Tap
![]() icon to enter the new category name, and then tap [OK] to save.
icon to enter the new category name, and then tap [OK] to save.
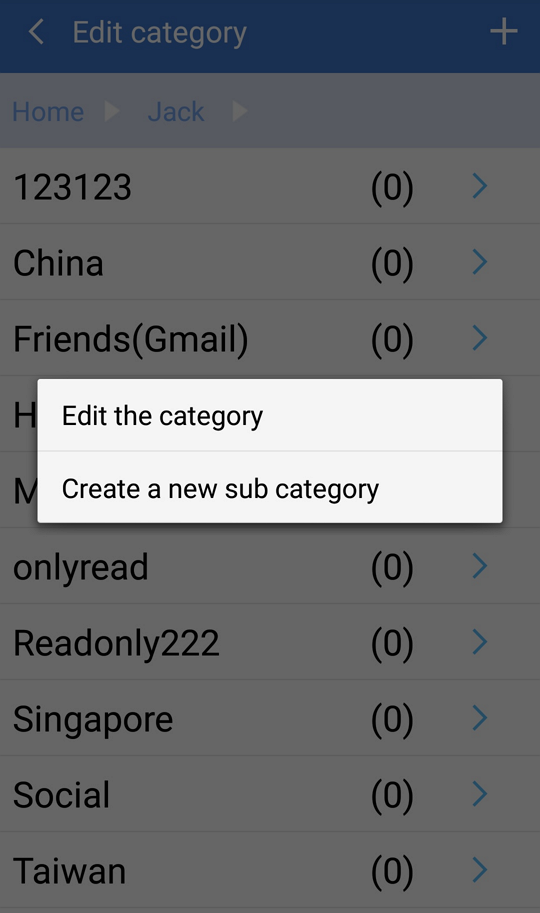
Modify/Delete Categories
Hold-press a category, and choose [Edit the category] to rename the category. Click [Delete] can delete the category from the list.
Note: You need to clear all the sub-category and contacts information from the category before deleting it.
Change Contacts' category
Tap
![]() on the top-right corner of [May Favorite], and tick one or many contacts, then
tap
on the top-right corner of [May Favorite], and tick one or many contacts, then
tap
![]() on the top-right corner, and select [Change category], and then choose the
category you want to change to change.
on the top-right corner, and select [Change category], and then choose the
category you want to change to change.
Tips: Hold-press on a contact in the contact list, and select [Select Category], can change the category of this contact, too.
You can add the [Category Shortcut] from [All Categories] of [Public Contacts] to view the commonly-used categories and contacts information immediately.
Click the category name in [Public Contacts] to open category list.
Hold-press the category name and choose [Add to Category Shortcut], then the selected category will be shown in the category shortcut.
If you have permission, you can copy other users' cards information in [Public Contacts] to [My Favorites] for quick access to the information.
Click the category name in [Public Contacts] to open category list.
Click the category and enter to its contact list.
Hold-press a contact information and choose [Copy contact(s) to My Favorite].
After selecting the category you need, the contacts will be shown in that category in [My Favorites].
In you can add the category shortcuts from [Public Contacts] to [My Favorite Categories].
Click the category name in [Public Contacts] to open the category list.
Tap
![]() beside the category name and make it turn into
beside the category name and make it turn into
![]() , then you can view the category in [My Favorites] category list.
, then you can view the category in [My Favorites] category list.
Note: The system will only add the category you selected.
If you want to add the sub-category, you have to click and
enter the sub-category list to tap on
![]()
View and Use the Contact Information
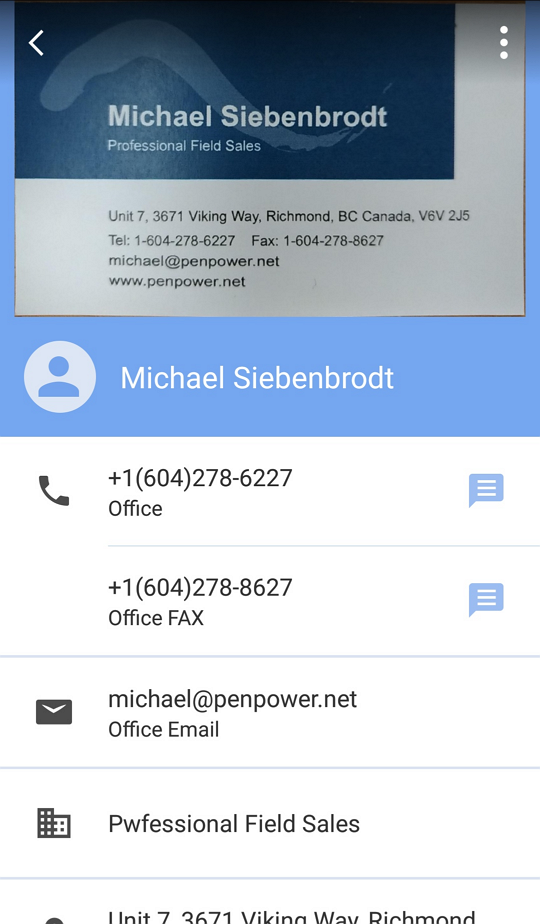
After establishing your own contacts, you can review and use these contact information anytime.
If you have lots of contacts, you can use the full text search function on the top on screen to find your data, you can enter any keyword of any field, and it will list all the results.
When you review the contact information, you can tap the following icons to trigger the related functions:
Phone![]() :
Tap to call this contact or tap
:
Tap to call this contact or tap ![]() to send text.
to send text.
Email![]() :
Tap to send Email to the contact.
:
Tap to send Email to the contact.
Address![]() :
Tap to open the map to search the contact's
address.
:
Tap to open the map to search the contact's
address.
Web Page![]() :
Tap to open the contact's web page.
:
Tap to open the contact's web page.
If the contact's card has double sides
information, tap ![]() to switch the card image to the other side.
to switch the card image to the other side.
Tap ![]() on the up-right corner, and tap [Search on Social Network], can
search this contact on social networks.
on the up-right corner, and tap [Search on Social Network], can
search this contact on social networks.
Also when in the main page, you can tap
![]() icon to select the contacts, and then tap
icon to select the contacts, and then tap
![]() /
/
![]() to send Email or text to the selected contacts, you can also tap
to send Email or text to the selected contacts, you can also tap
![]() to modify the contact's category or tap
to modify the contact's category or tap
![]() to share the contacts information to other people.
to share the contacts information to other people.
Tap
![]() icon to delete the contacts; If you want to export the contacts,
please tap
icon to delete the contacts; If you want to export the contacts,
please tap
![]() .
.
Tap
![]() at the bottom right of the main
page to
enter the setting page.
at the bottom right of the main
page to
enter the setting page.
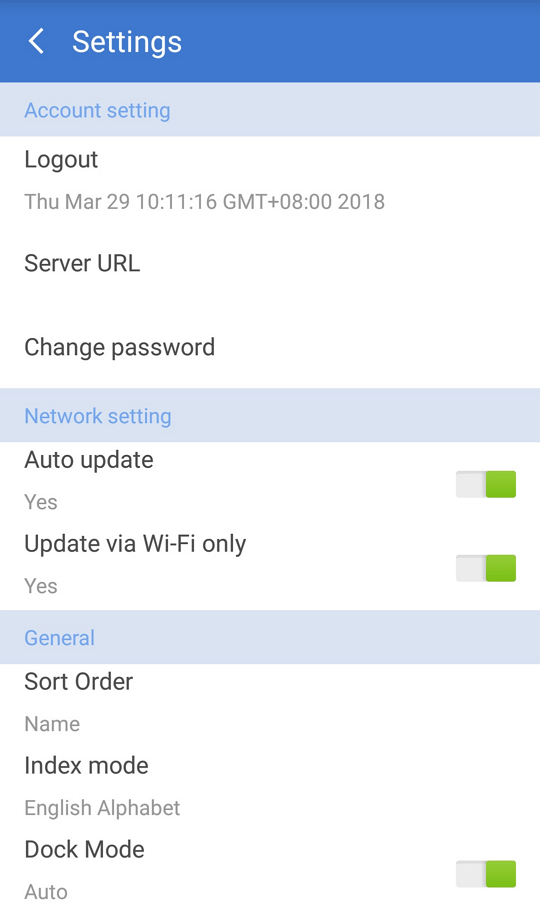
Account setting: In this section, you can log out your account, edit the server URL and change the password.
Network setting: If you enable [Auto update], the system will update the information in [My Favorites] to [Public Contacts] automatically, and please manually update the information if you disable. If you eable [Login/ Update via WiFi only], then you will need to log in or update information under WiFi connected.
General: You can set "Name", "Company", "Date: New-> Old" or "Date: Old -> New" to be the sort order of the contacts. As for index mode, there are "Pinyin", "Zhuyin" and "Stroke" for you to choose. If you use dock mode to take pictures, you can set auto or manual way to take pictures here.
The system will base on the actual Internet condition and users' Internet condition setting to log in to the server automatically. You can use WorldCard Enterprise offline when the URL is wrong or no Internet access.
However, the system will need you to enter the same account and password as the last time you entered for the verification.
2018/03/28